
Welcome to the Irish Mini Owners Club Forum. Keep an eye out of on coming events!!!!
Project Nancy
Moderators: spud1979, The Marcos Graveyard, Moderators
-
woody

- IMOC Paid Member
- Posts: 2820
- Joined: Mon Feb 07, 2005 11:55 pm
- Whats your location?: Drogheda
- Region: Eastern
- What Minis have you?: Traveller
Turbo
Hornet
Equinox
MINI Clubman - Location: LOUTH
- Contact:
Re: Project Nancy
What your looking for is a front floor pan which covers from the crossmember to the bulkhead and from the tunnel to the step including the inner sill. If you look at 61van resto you'll see how he did a nice patch without replacing the whole section and this from a guy who also likes his cars rust free.
TECHNICAL MODERATOR

-
just_st3v3n

- NON Member
- Posts: 785
- Joined: Wed Mar 01, 2006 11:22 am
- Whats your location?: cavan
- Region: Northern
- What Minis have you?: 1989 red mayfair aka project nancy
- Modifications: Nancy is deseamed and will be getting some sort of modern engine someday
- Location: cavan
- Contact:
Re: Project Nancy
thanks for replies lads..
dont have the funds really to order the floor pan so i went and cleaned up the whole area and and cut out whatever i thought needed cutting... left with 4 square holes now LOL
LOL
anyway, i made up new patches for each of the holes and started to weld in the first piece.
will post some pics tomoro..
dont have the funds really to order the floor pan so i went and cleaned up the whole area and and cut out whatever i thought needed cutting... left with 4 square holes now
anyway, i made up new patches for each of the holes and started to weld in the first piece.
will post some pics tomoro..
-
just_st3v3n
- NON Member
- Posts: 785
- Joined: Wed Mar 01, 2006 11:22 am
- Whats your location?: cavan
- Region: Northern
- What Minis have you?: 1989 red mayfair aka project nancy
- Modifications: Nancy is deseamed and will be getting some sort of modern engine someday
- Location: cavan
- Contact:
Re: Project Nancy
been a while again.. well since got pics up anyway 
got a bit done over xmass etc. got the sill off and cut out the rust , leaving with plenty of square holes, got most them patched up...
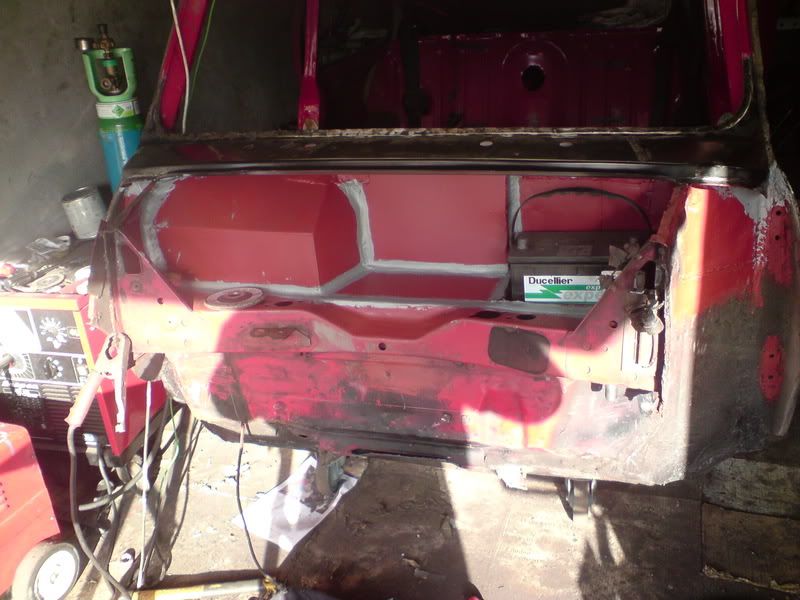
am stuck though heres a pic of where im stuck its taking from the bottom of the car. it is at the front of the floor panel (normally covered by a sill)
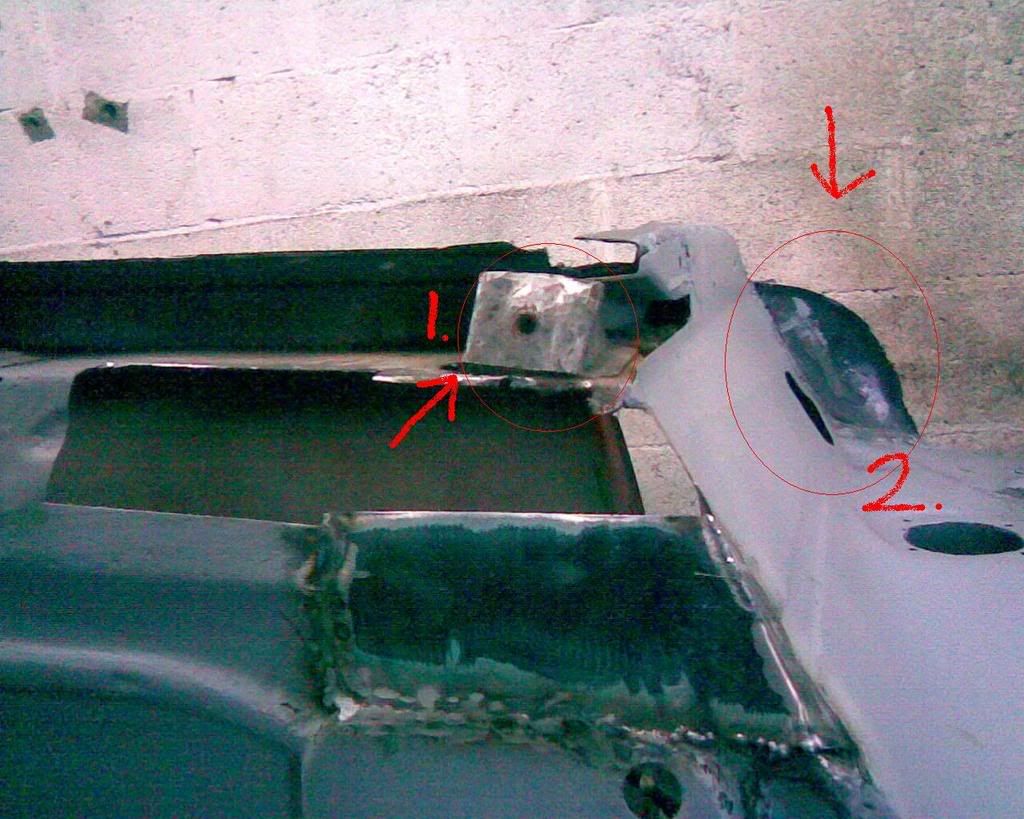
its marked numbers one and two is where im stuck
1. this bracket is full of rust so i rang someone about it to see if it was ok to cut out, he said best would be to replace it as it was there for a reason, but was thinkin, could it have been a bracket used to mount the car onto as it was built on the rollers in the mini making factory ???
there is the same bracket at the other end of the floor, it is rusted also but is slightly worse and the rust has evolved into the rear inner bin...
2.when i took the scuttle panel off this was left underneath it ??? whats it for, do i need it??
not to sure but it could also be part of the scuttle panel ???
confused a lil.........
steven
got a bit done over xmass etc. got the sill off and cut out the rust , leaving with plenty of square holes, got most them patched up...
am stuck though heres a pic of where im stuck its taking from the bottom of the car. it is at the front of the floor panel (normally covered by a sill)
its marked numbers one and two is where im stuck
1. this bracket is full of rust so i rang someone about it to see if it was ok to cut out, he said best would be to replace it as it was there for a reason, but was thinkin, could it have been a bracket used to mount the car onto as it was built on the rollers in the mini making factory ???
there is the same bracket at the other end of the floor, it is rusted also but is slightly worse and the rust has evolved into the rear inner bin...
2.when i took the scuttle panel off this was left underneath it ??? whats it for, do i need it??
not to sure but it could also be part of the scuttle panel ???
confused a lil.........
steven
-
kerryminigringo
- IMOC Paid Member
- Posts: 2680
- Joined: Thu Feb 10, 2005 9:44 pm
- Whats your location?: Between an A series and a G13B
- Region: Eastern
- What Minis have you?: 61 van,68 MKII,
75 Clubman estate,
80 1275GT
91 RSP Cooper - Location: Between an A series and a G13B
- Contact:
Re: Project Nancy
Not sure about number 1 Steven but number 2 is the scuttle closing panel and if it,s rusty it is better to replace it now especially with the wing off as it's nigh on impossible to do with the wing on and it stops water and mud from being thrown up onto the scuttle panel itself and rotting it from the inside out.By the way they are cheap to buy.
Real Clubmans have a square nose.Seriously.
-
just_st3v3n
- NON Member
- Posts: 785
- Joined: Wed Mar 01, 2006 11:22 am
- Whats your location?: cavan
- Region: Northern
- What Minis have you?: 1989 red mayfair aka project nancy
- Modifications: Nancy is deseamed and will be getting some sort of modern engine someday
- Location: cavan
- Contact:
Re: Project Nancy
thankn u..
must order some scuttle closing panels so (as u say) its not that they rusty they were replaced (previous owner, or previous to that) but badly welded on and the edges are a bit rough so just gonna replace them while im doing the lot. once they are off never know what sort of buggers mite find , hope not more rust anyway ...
thanks
must order some scuttle closing panels so (as u say
thanks
-
woody
- IMOC Paid Member
- Posts: 2820
- Joined: Mon Feb 07, 2005 11:55 pm
- Whats your location?: Drogheda
- Region: Eastern
- What Minis have you?: Traveller
Turbo
Hornet
Equinox
MINI Clubman - Location: LOUTH
- Contact:
Re: Project Nancy
No 1 is for producton line.Treat it with rust converter and leave it alone or just remove it altogether. No 2 is as stated above.
TECHNICAL MODERATOR
-
just_st3v3n
- NON Member
- Posts: 785
- Joined: Wed Mar 01, 2006 11:22 am
- Whats your location?: cavan
- Region: Northern
- What Minis have you?: 1989 red mayfair aka project nancy
- Modifications: Nancy is deseamed and will be getting some sort of modern engine someday
- Location: cavan
- Contact:
Re: Project Nancy
thanks woody
i have already cut the metal where the bracket was attached as it was also rusty. i was planning on welding in a new patch and to make up a new bracket, but as you say it is only for production line use is there a need to fit another bracket?? its not there for support or anything??
there is the exact same bracket on the rear floor pan its rusted also.. cut it out and repatch?
-
woody
- IMOC Paid Member
- Posts: 2820
- Joined: Mon Feb 07, 2005 11:55 pm
- Whats your location?: Drogheda
- Region: Eastern
- What Minis have you?: Traveller
Turbo
Hornet
Equinox
MINI Clubman - Location: LOUTH
- Contact:
Re: Project Nancy
I've done several sills over the years and never bothered with them.
TECHNICAL MODERATOR
-
just_st3v3n
- NON Member
- Posts: 785
- Joined: Wed Mar 01, 2006 11:22 am
- Whats your location?: cavan
- Region: Northern
- What Minis have you?: 1989 red mayfair aka project nancy
- Modifications: Nancy is deseamed and will be getting some sort of modern engine someday
- Location: cavan
- Contact:
Re: Project Nancy
once again.. been awhile...
i have however both sides of the floor which are covered by sills normally, rust free and patched up 90% ..
i got a bit bored with the floors so i decided to trial fit the boot floor panel (genuine panel), i lined the subframe up with the body, then placed the holes on the floor panel directly over the subframe bracket holes and put a few spot welds to hold it in place... however, the right side of the boot floor lines up perfectly with the outer body but the left side of the floor does not. the floor panel sticks out - about 1 cm from the body panel......................... (with me so far ?)
before i weld the boot floor in place fully i am just wondering is this normal or could the body have slightly warped from having it on its side or something?
il get some pics up later
steven
-
woody
- IMOC Paid Member
- Posts: 2820
- Joined: Mon Feb 07, 2005 11:55 pm
- Whats your location?: Drogheda
- Region: Eastern
- What Minis have you?: Traveller
Turbo
Hornet
Equinox
MINI Clubman - Location: LOUTH
- Contact:
Re: Project Nancy
Is the boot lid fitted and is IT lining up properly?Was there any sign of a rear impact peviously?
TECHNICAL MODERATOR
-
just_st3v3n
- NON Member
- Posts: 785
- Joined: Wed Mar 01, 2006 11:22 am
- Whats your location?: cavan
- Region: Northern
- What Minis have you?: 1989 red mayfair aka project nancy
- Modifications: Nancy is deseamed and will be getting some sort of modern engine someday
- Location: cavan
- Contact:
Re: Project Nancy
no i didnt fit the boot lid.. should do then so yea and then line it all up again??
no sign of any previous impact..
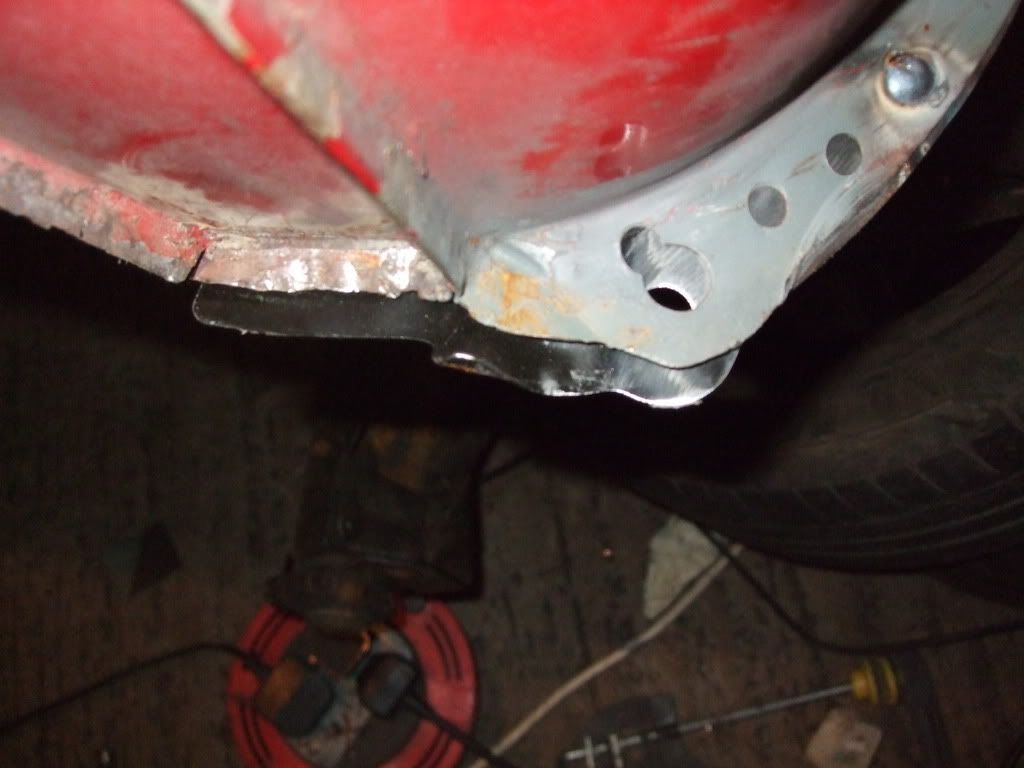
got a few pics taken
here is the left side where it sticks out just slightly, proper camera for once
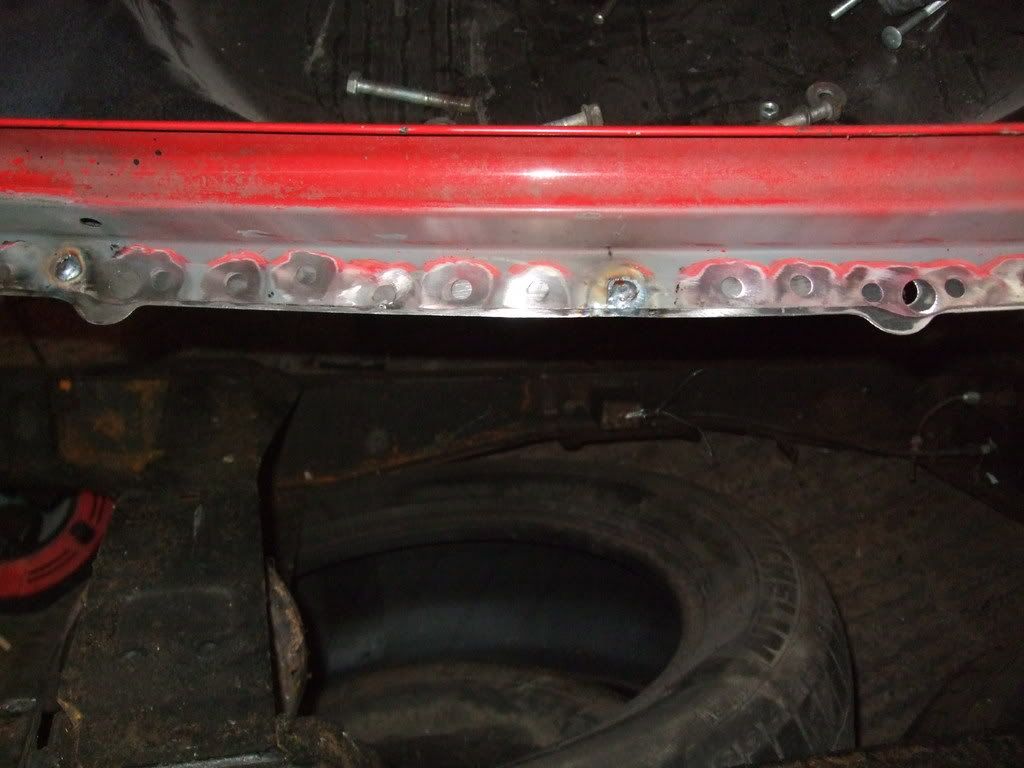
the middle part
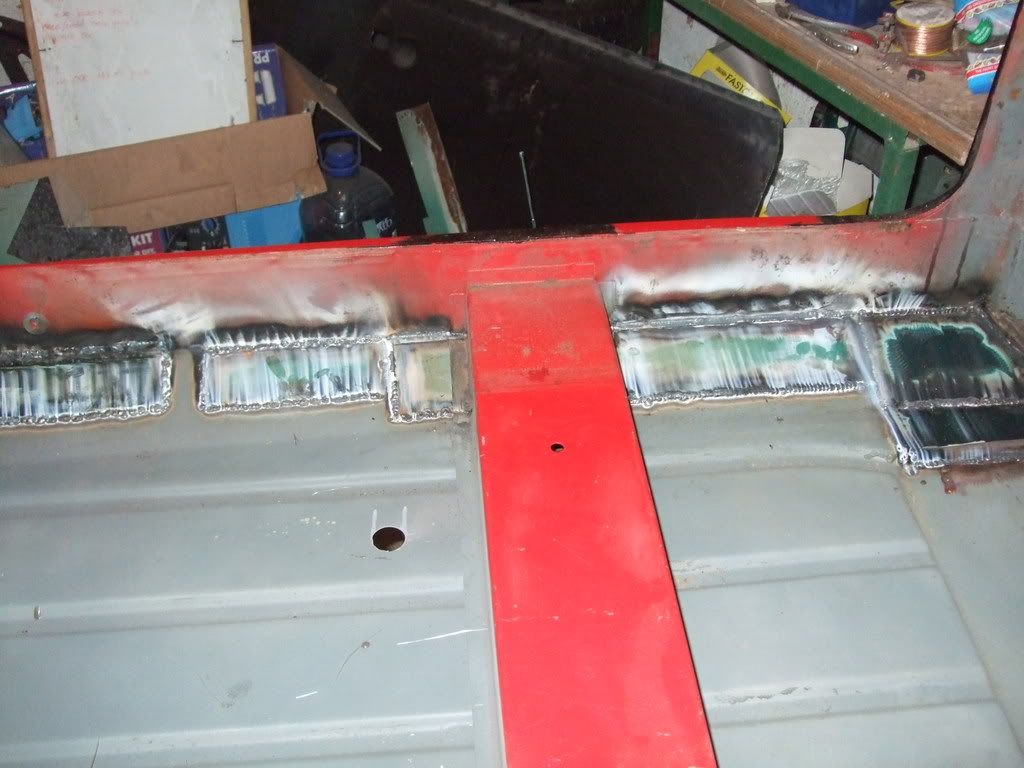
and some welding on main floor, welded from the outside the pic shows the weld penetration
no sign of any previous impact..
got a few pics taken
here is the left side where it sticks out just slightly, proper camera for once
the middle part
and some welding on main floor, welded from the outside the pic shows the weld penetration
-
just_st3v3n
- NON Member
- Posts: 785
- Joined: Wed Mar 01, 2006 11:22 am
- Whats your location?: cavan
- Region: Northern
- What Minis have you?: 1989 red mayfair aka project nancy
- Modifications: Nancy is deseamed and will be getting some sort of modern engine someday
- Location: cavan
- Contact:
Re: Project Nancy
bootlid wasnt perfect so i drilled out the spotweldsearlier and adjusted the floor a bit.. lining up nicely now  thanks for that tip woody...
as for the slight bit sticking out on one side it gonna be grinded downonce its spotted in fully..
as for the slight bit sticking out on one side it gonna be grinded downonce its spotted in fully..
-
Jason79
- NON Member
- Posts: 188
- Joined: Tue Aug 19, 2008 1:19 pm
- Whats your location?: -
- Region: Western
- Location: Carrick on Shannon,Roscommon
- Contact:
Re: Project Nancy
From the looks of it thats some serious work ur doing there.The penitration on the weld looks great,thats a sign of a strong weld however im no expert! i kinda wish i spent some more time on my welding  but theres always next time...what ur ideas for styling, archs and colour?..on the dark cold nights of winter is always good for inspiration
-
just_st3v3n
- NON Member
- Posts: 785
- Joined: Wed Mar 01, 2006 11:22 am
- Whats your location?: cavan
- Region: Northern
- What Minis have you?: 1989 red mayfair aka project nancy
- Modifications: Nancy is deseamed and will be getting some sort of modern engine someday
- Location: cavan
- Contact:
Re: Project Nancy
cheers jason... managed to bring home the two engines that were beside the mini so i can start doing some work on them soon.. oh, i have a picture on my desktop of a black mini with sportspack arches, deep dish alloys, sideskirts and a bit of chrome... cant find where the picture is stored so cant post it up here but thats what i want it to look like me thinks... although the colour red is playing games wit my head too oh and now the de-bumpered mini that was on the kerry run has also made me start thinkin...
im going to de-seam the car which is gonna be the hardest thing i reckon afraid to attempt it so far as i have never seen a de-seamed mini in the flesh never mind how exactly its done, although funny thing is i have the seam cut at 4 inches apart all the way from the roof gutter to the bottom so id make sure i do it
did a bit more today and managed to get the boot floor which extends to the inner rear seat welded in.. the spot welding wasnt goin so nice on the rear bins so i improvised a bit will try get some pics up asap
im going to de-seam the car which is gonna be the hardest thing i reckon
did a bit more today and managed to get the boot floor which extends to the inner rear seat welded in.. the spot welding wasnt goin so nice on the rear bins so i improvised a bit
-
just_st3v3n
- NON Member
- Posts: 785
- Joined: Wed Mar 01, 2006 11:22 am
- Whats your location?: cavan
- Region: Northern
- What Minis have you?: 1989 red mayfair aka project nancy
- Modifications: Nancy is deseamed and will be getting some sort of modern engine someday
- Location: cavan
- Contact:
Re: Project Nancy
got the boot welded in fully today which also incl. the back seatrest spot welded on bootfloor..
realised i have 2 rear arch replacement panels so i cut out one side as there was rust at the bottom of the arch where it meets the lip and inner pocket...
found a place in town that sold the exact bolt (which im missing) that fits the subframe mounting to the body
realised i have 2 rear arch replacement panels so i cut out one side as there was rust at the bottom of the arch where it meets the lip and inner pocket...
found a place in town that sold the exact bolt (which im missing) that fits the subframe mounting to the body
Re: Project Nancy
keep up the good work stephen
your making good progress
when are u going to tackle the front end
hows your other two minis going for ya
your making good progress
when are u going to tackle the front end
hows your other two minis going for ya
-
just_st3v3n
- NON Member
- Posts: 785
- Joined: Wed Mar 01, 2006 11:22 am
- Whats your location?: cavan
- Region: Northern
- What Minis have you?: 1989 red mayfair aka project nancy
- Modifications: Nancy is deseamed and will be getting some sort of modern engine someday
- Location: cavan
- Contact:
Re: Project Nancy
thanks tom
my red mini failed its nct bout a month ago but its not being driven so theres no rush with getting it fixed up. (no funds either)
and my new racing green mini is causing a bit of hassle lately, electrics, newly appeared thump noise from the back, but im not worried about it, it was mot-ted when i got the car so i believe not to touch it for the next year am washing it and keeping it clean but thats about it..
as for the front end, i need to order some panels before im able to fit it
i have so far for the front:
one a panel already attched by previous owner but im considering taking it off and putting on a genuine new one.
have a cheapie a panel spare.
i have the complete front panel.
and one cheapie arch panel...
i have seen the quality and difference between genuine panels and non genuine ones and there really is a big difference
so im gonna wait it out till i have enough money and order all genuine panels that i will be needing for the rest of the restoration
was looking at different mini projects around the web and also came up with the idea of reducing the rear pockets sizes to make more space for the seats i have and possible bucket seats...
so plans for tomorow are to start making a strengthening plate for the rear subframe mounting (that wat ya call it ?)
look and plan on shortening the rear pockets also... and if i really work hard to fit the rear arch replacement panel
the joys
found it!!! im working towards the car looking a lil something like this....

my red mini failed its nct bout a month ago but its not being driven so theres no rush with getting it fixed up. (no funds either)
and my new racing green mini is causing a bit of hassle lately, electrics, newly appeared thump noise from the back, but im not worried about it, it was mot-ted when i got the car so i believe not to touch it for the next year
as for the front end, i need to order some panels before im able to fit it
i have so far for the front:
one a panel already attched by previous owner but im considering taking it off and putting on a genuine new one.
have a cheapie a panel spare.
i have the complete front panel.
and one cheapie arch panel...
i have seen the quality and difference between genuine panels and non genuine ones and there really is a big difference
so im gonna wait it out till i have enough money and order all genuine panels that i will be needing for the rest of the restoration
was looking at different mini projects around the web and also came up with the idea of reducing the rear pockets sizes to make more space for the seats i have and possible bucket seats...
so plans for tomorow are to start making a strengthening plate for the rear subframe mounting (that wat ya call it ?)
look and plan on shortening the rear pockets also...
the joys
found it!!! im working towards the car looking a lil something like this....
-
mustard

- NON Member
- Posts: 1111
- Joined: Wed Jan 03, 2007 1:11 pm
- What Minis have you?: 97 rover cooper sportspack, a bloody metro and MY 61 mini van
- Location: athboy, co. meath
- Contact:
Re: Project Nancy
love the reg... 666!!!
If ya can't fix it with a hammer, its an electrical problem!
J & A Commercials and Auto Repairs ltd.
From Minis to Trucks, everything and anything
Clondalkin Dublin 22
Contact Mick: 0868526492 or 014578687
J & A Commercials and Auto Repairs ltd.
From Minis to Trucks, everything and anything
Clondalkin Dublin 22
Contact Mick: 0868526492 or 014578687
Re: Project Nancy
that black mini is fecking class.i want it
i used ta have a1983 black mini with white roof but i sold it
when i started to build my house
keep up the good work stephen
i used ta have a1983 black mini with white roof but i sold it
when i started to build my house
keep up the good work stephen
-
The Marcos Graveyard

- IMOC Paid Member
- Posts: 4718
- Joined: Fri Feb 04, 2005 10:05 am
- Whats your location?: Longford
- Region: Eastern
- What Minis have you?: 1971 Mini Marcos.
1984 Mini Sprite - Modifications: 1380cc
Weber45
S/C CR gearbox and drop gears - Location: Longford
- Contact:
Re: Project Nancy
Spotted a roadster version of the black Mini in Germany last weekend.
Anyone want to lend me €24700 ?
Anyone want to lend me €24700 ?
A fully carbon fiber Mini Marcos shell weighs just 7.25kg.
-
just_st3v3n
- NON Member
- Posts: 785
- Joined: Wed Mar 01, 2006 11:22 am
- Whats your location?: cavan
- Region: Northern
- What Minis have you?: 1989 red mayfair aka project nancy
- Modifications: Nancy is deseamed and will be getting some sort of modern engine someday
- Location: cavan
- Contact:
Re: Project Nancy
il fund ya €2 euro towards it if i get second dibs on a spin in it!
been bad few days n bein v p-d off as well as slightly hungover..... whoever thought carrigallen was a good town to go out in
anyway, my attempts at making a bracket for the heel panel which conncects the rear subframe onto have passed and failed, not happy wit the end result so im gonna wait till i get some funds and just order the bracket from somerford along with most/all of the other panels ....
i have however started to carefully dismantle the 1275 engine i have...
i posted this on mr also but im sure ye lot can help me here too
il try my best at explaining all the parts conditions....
the bore was fine no scratches or nothing but i will take merlins advice and get the engine bored out by +20 (makes it a little nippyer too)
the numbers on the cam were 6232...... and then further along there were more GSB21KJ .... <---- what cam is this and is it any good ???
the camshaft bearings looked a little worn so they will need replacing..
the number on the pistons was : 21962 G8 P46...
they the normal size??
oh when i took the primary gear from the crankshaft i noticed one of the teeth was damaged (half missing)
my first attempt at dismantling an engine and found it entertaining/interesting and surprisingly quite easy.. alls i need to do now is try and figure out the names of the parts etc...
i have a list of parts i need for the engine as advised by merlin from mr.. but im missing and cant seem to find where to get : a hardened dif pin any one wanting to point it out i think it should be one of these parts on this page somewhere http://www.somerfordmini.co.uk/pdfs/Cat ... onents.pdf
steven
been bad few days n bein v p-d off as well as slightly hungover..... whoever thought carrigallen was a good town to go out in
anyway, my attempts at making a bracket for the heel panel which conncects the rear subframe onto have passed and failed, not happy wit the end result so im gonna wait till i get some funds and just order the bracket from somerford along with most/all of the other panels ....
i have however started to carefully dismantle the 1275 engine i have...
i posted this on mr also but im sure ye lot can help me here too
il try my best at explaining all the parts conditions....
the bore was fine no scratches or nothing but i will take merlins advice and get the engine bored out by +20 (makes it a little nippyer too)
the numbers on the cam were 6232...... and then further along there were more GSB21KJ .... <---- what cam is this and is it any good ???
the camshaft bearings looked a little worn so they will need replacing..
the number on the pistons was : 21962 G8 P46...
they the normal size??
oh when i took the primary gear from the crankshaft i noticed one of the teeth was damaged (half missing)
my first attempt at dismantling an engine and found it entertaining/interesting and surprisingly quite easy.. alls i need to do now is try and figure out the names of the parts etc...
i have a list of parts i need for the engine as advised by merlin from mr.. but im missing and cant seem to find where to get : a hardened dif pin
steven
-
The Marcos Graveyard
- IMOC Paid Member
- Posts: 4718
- Joined: Fri Feb 04, 2005 10:05 am
- Whats your location?: Longford
- Region: Eastern
- What Minis have you?: 1971 Mini Marcos.
1984 Mini Sprite - Modifications: 1380cc
Weber45
S/C CR gearbox and drop gears - Location: Longford
- Contact:
Re: Project Nancy
It's number 11 on this page Steven
http://www.somerford-mini.co.uk/pdfs/Ca ... ential.pdf
You would need to ring Somerford to get details of their uprated pins though.
http://www.somerford-mini.co.uk/pdfs/Ca ... ential.pdf
You would need to ring Somerford to get details of their uprated pins though.
A fully carbon fiber Mini Marcos shell weighs just 7.25kg.
-
just_st3v3n
- NON Member
- Posts: 785
- Joined: Wed Mar 01, 2006 11:22 am
- Whats your location?: cavan
- Region: Northern
- What Minis have you?: 1989 red mayfair aka project nancy
- Modifications: Nancy is deseamed and will be getting some sort of modern engine someday
- Location: cavan
- Contact:
Re: Project Nancy
cheers neill..
was checking out a replacement primary gear too as there is half of a tooth missing .. price from somerford ''PRIMARY GEAR ASSY 30 TEETH £220.17'' any ideas to that? will the primary gear from an A+ 998 engine do the job??
was checking out a replacement primary gear too as there is half of a tooth missing .. price from somerford ''PRIMARY GEAR ASSY 30 TEETH £220.17''
-
The Marcos Graveyard
- IMOC Paid Member
- Posts: 4718
- Joined: Fri Feb 04, 2005 10:05 am
- Whats your location?: Longford
- Region: Eastern
- What Minis have you?: 1971 Mini Marcos.
1984 Mini Sprite - Modifications: 1380cc
Weber45
S/C CR gearbox and drop gears - Location: Longford
- Contact:
Re: Project Nancy
No, a 998 primary gear won't fit on a 1300 crank, and to make matters worse there are A and A+ ones, so don't get the wrong one.
Perhaps someone might have a second hand one ? it is possible to have them rebushed if there is too much play in them.
Perhaps someone might have a second hand one ? it is possible to have them rebushed if there is too much play in them.
A fully carbon fiber Mini Marcos shell weighs just 7.25kg.
-
just_st3v3n
- NON Member
- Posts: 785
- Joined: Wed Mar 01, 2006 11:22 am
- Whats your location?: cavan
- Region: Northern
- What Minis have you?: 1989 red mayfair aka project nancy
- Modifications: Nancy is deseamed and will be getting some sort of modern engine someday
- Location: cavan
- Contact:
Re: Project Nancy
theres no real play in it i think, its just missing half of one of the teeth 
found more rust on the a post today.....................
floor is completely zinc 182 primed (2nd coat, first was zinc cans from halfords)
passenger side air duct hole on the bulk head rusty, removed..
then p-d off working in a mess i decided to clean the workplace... only took an hour
came across this on a project too... battery box in bulkhead
what ya think shall i give it a go???
Who is online
Users browsing this forum: Bing [Bot] and 2 guests
