
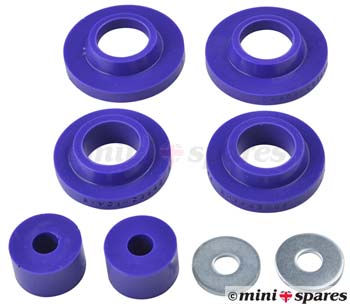
You should have been supplied with the inserts for the Poly front pear mounts.
Depends on supplier
I have the bolts / washers / nuts and additionally poly mounts - not all -and rubber too
http://www.richmondclassicscarparts.co.uk/
Welcome to the Irish Mini Owners Club Forum. Keep an eye out of on coming events!!!!
1983 Mini City
Moderators: spud1979, The Marcos Graveyard, Moderators
-
NeilRichmond

- NON Member
- Posts: 15
- Joined: Wed Feb 10, 2021 5:38 pm
- Whats your location?: Mayo
- Region: Western
- Location: Co Mayo
- Contact:

-
woody

- IMOC Paid Member
- Posts: 2819
- Joined: Mon Feb 07, 2005 11:55 pm
- Whats your location?: Drogheda
- Region: Eastern
- What Minis have you?: Traveller
Turbo
Hornet
Equinox
MINI Clubman - Location: LOUTH
- Contact:
Re: 1983 Mini City
NeilRichmond wrote: ↑Mon Mar 01, 2021 8:23 pm You should have been supplied with the inserts for the Poly front pear mounts.
Depends on supplier
I have the bolts / washers / nuts and additionally poly mounts - not all -and rubber too
http://www.richmondclassicscarparts.co.uk/
Good to see an Irish based supplier .Your link above should be .ie not .co.uk.
Will items be posted from Ireland or UK and attract duty?
TECHNICAL MODERATOR
-
colinf1

- NON Member
- Posts: 424
- Joined: Mon Aug 24, 2020 10:27 am
- Whats your location?: Dundalk
- Region: Eastern
- What Minis have you?: 1983 Mini City 1000
- Contact:
Re: 1983 Mini City
This is the mounting kit I got from minispares - http://www.minispares.com/product/Class ... tings.aspx
That site seems pretty good on prices, be interesting to know the same as what Woody has asked.

-
colinf1
- NON Member
- Posts: 424
- Joined: Mon Aug 24, 2020 10:27 am
- Whats your location?: Dundalk
- Region: Eastern
- What Minis have you?: 1983 Mini City 1000
- Contact:
Re: 1983 Mini City
An hour or so at the mini this afternoon. Chopped the remaining part of the closing panel on the RH inner wing off, also the top part of the inner wing that's above that closing panel.

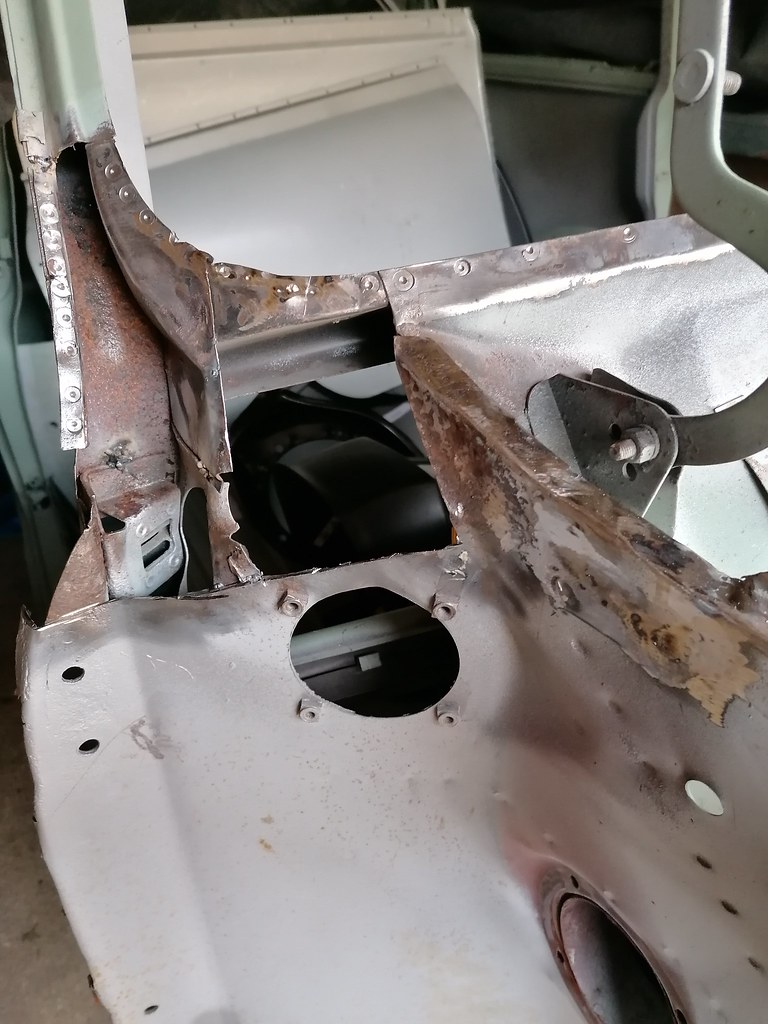
I'll make a cardboard template from the LH inner wing and try to patch it that way.
There was also a small amount of rust just on the top of the inner wing, just below the edge of the scuttle panel, patched in a small piece of fresh metal.
Seemed to weld in fine, but had a few pin holes that I ended up chasing.
Went to attach the teardrops to the new front panel, using the bolts from the old panel, bolts felt tight so cleaned up the threads with 5/16 die, offered them up again and the captive nuts broke off the panel! They look to be 5/16 unc rather than unf that was in old panel! Tried the opposite side and it was the same, so new nuts and bolts needed for that...
-
NeilRichmond
- NON Member
- Posts: 15
- Joined: Wed Feb 10, 2021 5:38 pm
- Whats your location?: Mayo
- Region: Western
- Location: Co Mayo
- Contact:
Re: 1983 Mini City
They indeed use a 5/16 UNF nut and bolt. The part number for the bolt is GFK5184 for your year of Mini.
-
colinf1
- NON Member
- Posts: 424
- Joined: Mon Aug 24, 2020 10:27 am
- Whats your location?: Dundalk
- Region: Eastern
- What Minis have you?: 1983 Mini City 1000
- Contact:
Re: 1983 Mini City
Made up a small patch panel to close off inner wing. Still having issues with my welding, blowing through very easily whatever I'm doing wrong...

-
ctwomey
- NON Member
- Posts: 297
- Joined: Thu Jan 03, 2019 9:44 am
- Whats your location?: Ballybrittas, Co. Laois
- Region: Eastern
- What Minis have you?: I owned a 1978 Mini 850 when I was in my late teens. I owned a 1986 Mini Chelsea that I imported from the UK. Also owned a 1982 MG Metro that was bored out to 1293. Restoring a 1981 Dublin Mini City.
- Contact:
Re: 1983 Mini City
My problem is that I am putting too much heat into the panel when grinding down the welds and warping my patch panels.
Won’t be touching any new panels until I get my technique right and I can do this butt welding with confidence. Damn it’s a different set of challenges compared with thicker steel.
Won’t be touching any new panels until I get my technique right and I can do this butt welding with confidence. Damn it’s a different set of challenges compared with thicker steel.
-
daniel garry

- NON Member
- Posts: 841
- Joined: Mon Jun 15, 2009 1:20 pm
- Whats your location?: cavan
- Region: Western
- What Minis have you?: 1996 BRG mayfair 1275 auto-lyin up now
1990 1l city-daily driver
1993 cooper spi-completly stripped and upside down!
the long term project(advantage) courtesy of mr skelly!!
rotten shell-found a floor repair panel in the boot tho! - Contact:
Re: 1983 Mini City
clamp a bit of flattened copper pipe behind the joint, it'll act as a backing for the weld and will take some of the heat away
are you grinding with a grinding disc or a flap disc? the grinding disc is quicker but not quite as forgiving! i prefer a little slower but not thinning the metal or putting too much heat in

-
colinf1
- NON Member
- Posts: 424
- Joined: Mon Aug 24, 2020 10:27 am
- Whats your location?: Dundalk
- Region: Eastern
- What Minis have you?: 1983 Mini City 1000
- Contact:
Re: 1983 Mini City
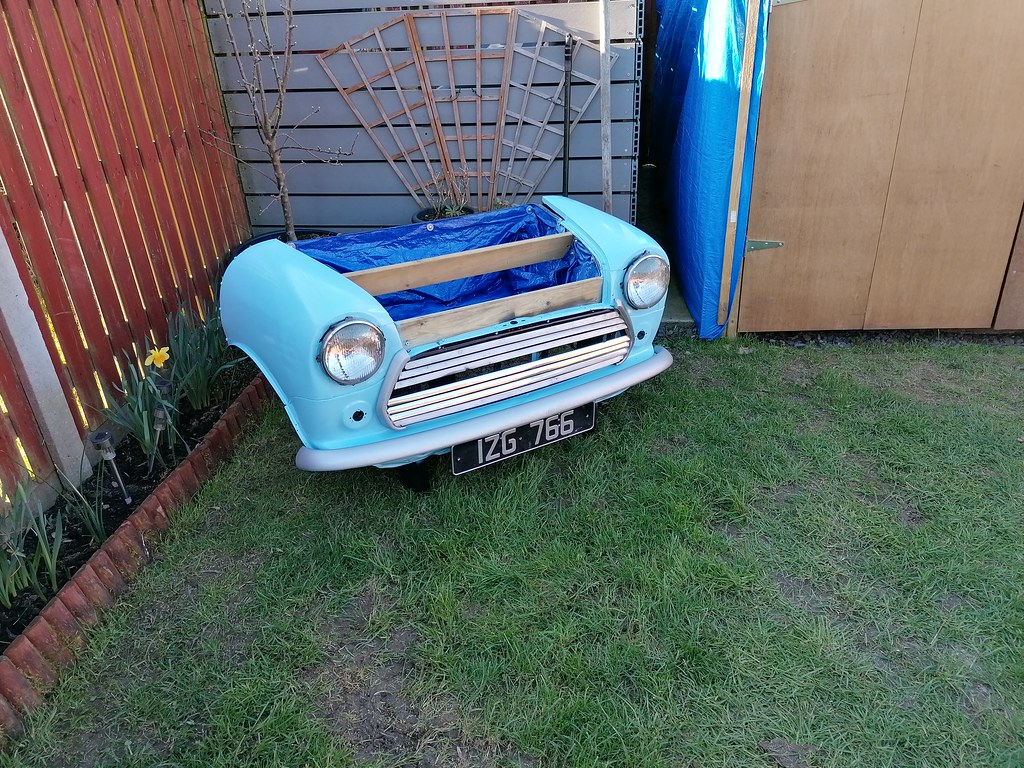
Old sealed beams cable tied in, old bumper sprayed silver and the old grille pop riveted back together, the beginnings of a flower planter...
Gonna stick in a wooden frame to give it some strength, then maybe 2 old wheels and tyres just to finish it off...

Cleans out some of the old parts from the shed. Looks like weather is picking up so might be able to get something done on the car.
Cleaning my welds using a grinding disc, then finishing it off with flap wheel, but maybe I'm trying to take off too much material in one go, I'll try and reduce the amount of material I'm grinding back, hopefully reduce heat build up
Gonna stick in a wooden frame to give it some strength, then maybe 2 old wheels and tyres just to finish it off...
Cleans out some of the old parts from the shed. Looks like weather is picking up so might be able to get something done on the car.
Cleaning my welds using a grinding disc, then finishing it off with flap wheel, but maybe I'm trying to take off too much material in one go, I'll try and reduce the amount of material I'm grinding back, hopefully reduce heat build up
-
colinf1
- NON Member
- Posts: 424
- Joined: Mon Aug 24, 2020 10:27 am
- Whats your location?: Dundalk
- Region: Eastern
- What Minis have you?: 1983 Mini City 1000
- Contact:
Re: 1983 Mini City
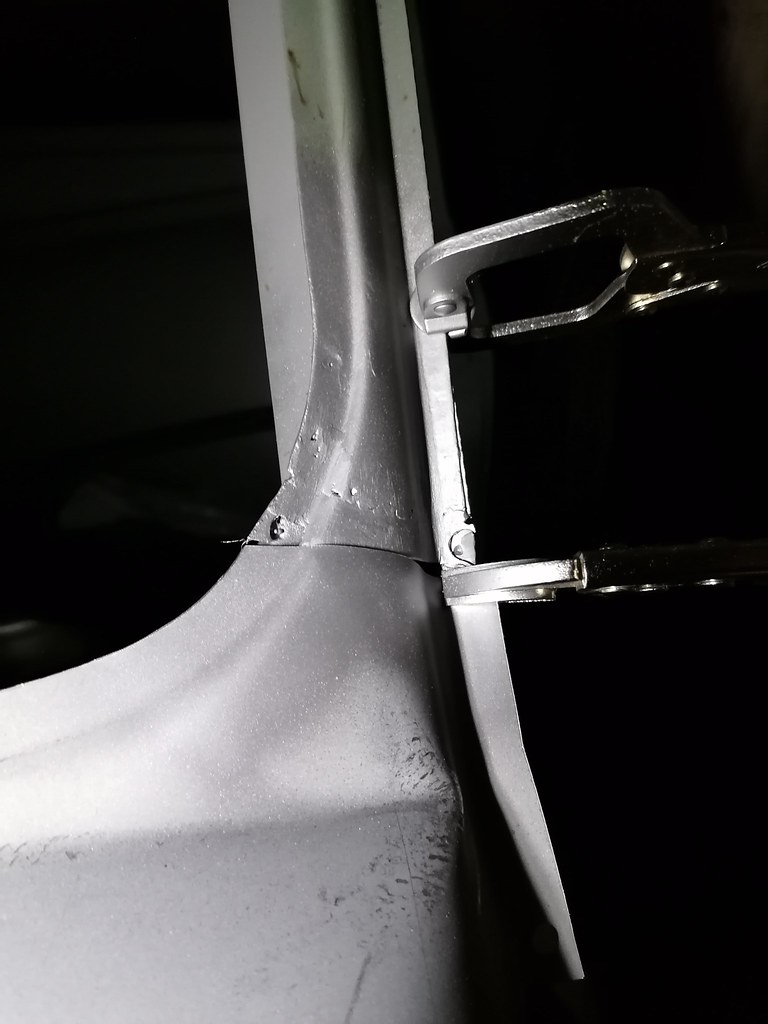
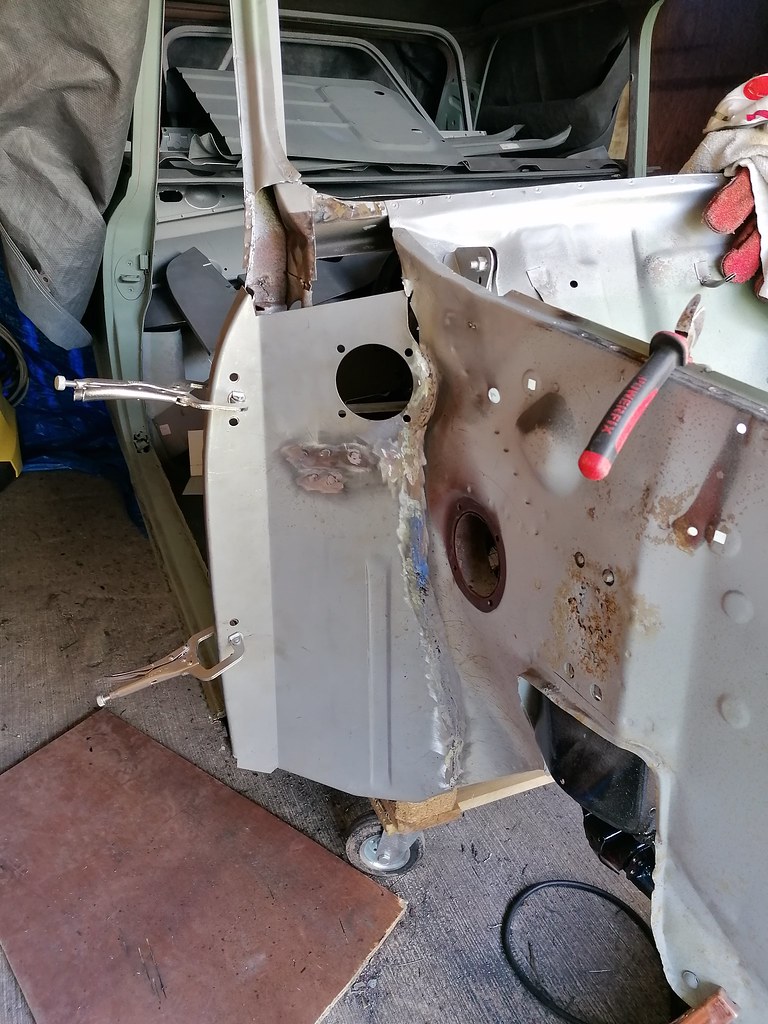
I cut the A-post/scuttle panel too high compared to the replacement scuttle - magnum panel so it doesn't go as high on a-post as genuine panel.
Offered the old one back up and scribed what I needed to keep, was about 30mm on RH side, 10mm on LH side. Took my time tacking it back in, then turned the grinder speed right down to reduce the amount of heat transferring into the welds,worked out much better with only a few pinholes to sort.
I am going to cut out and redo the patch on the inner RH wing as the material I used was slightly lighter than the actual wing, so maybe that's why it was blowing through so easily. I have a good section of the old LH inner wing to cut from.

Got my planter finished, ready for flowers
Offered the old one back up and scribed what I needed to keep, was about 30mm on RH side, 10mm on LH side. Took my time tacking it back in, then turned the grinder speed right down to reduce the amount of heat transferring into the welds,worked out much better with only a few pinholes to sort.
I am going to cut out and redo the patch on the inner RH wing as the material I used was slightly lighter than the actual wing, so maybe that's why it was blowing through so easily. I have a good section of the old LH inner wing to cut from.
Got my planter finished, ready for flowers
-
colinf1
- NON Member
- Posts: 424
- Joined: Mon Aug 24, 2020 10:27 am
- Whats your location?: Dundalk
- Region: Eastern
- What Minis have you?: 1983 Mini City 1000
- Contact:
Re: 1983 Mini City
Got a centre cap for the steering wheel, matches the emblem on the replacement grille I got...

I think originally it would of had the 2 spoke steering wheel, but this steering wheel is in pretty much perfect condition and the centre cap is much better than that heavy disc of polished stainless that was wedged in there!
I think originally it would of had the 2 spoke steering wheel, but this steering wheel is in pretty much perfect condition and the centre cap is much better than that heavy disc of polished stainless that was wedged in there!
-
colinf1
- NON Member
- Posts: 424
- Joined: Mon Aug 24, 2020 10:27 am
- Whats your location?: Dundalk
- Region: Eastern
- What Minis have you?: 1983 Mini City 1000
- Contact:
Re: 1983 Mini City
Been a bit busy doing jobs around the house the past few weeks to get any real progress on the mini, but got a few hours over the past few evenings to have a look at the master cylinders.
Brake master is a black tag GMC167, rebuild kit hasn't been available for quite some time on minispares, but I thought I'd have a look see what condition its in..
Rubber boot was missing when removed from the car, and bottom of body was quite corroded. Plunger also rusty and holes elongated. Circlip was missing it's eyelets for compressing it and was rusted into the body. Eventually got it out but not a chance of getting the piston out, the bore has swelled up with corrosion to prevent it sliding out. Straight to the bin...
That's another part added to the shopping cart!
Had a quick look at clutch MC, have a rebuild kit for it, but plunger eyelets are elongated too, lots of corrosion on the canister so might need to replace that one with new also...
-
ctwomey
- NON Member
- Posts: 297
- Joined: Thu Jan 03, 2019 9:44 am
- Whats your location?: Ballybrittas, Co. Laois
- Region: Eastern
- What Minis have you?: I owned a 1978 Mini 850 when I was in my late teens. I owned a 1986 Mini Chelsea that I imported from the UK. Also owned a 1982 MG Metro that was bored out to 1293. Restoring a 1981 Dublin Mini City.
- Contact:
-
colinf1
- NON Member
- Posts: 424
- Joined: Mon Aug 24, 2020 10:27 am
- Whats your location?: Dundalk
- Region: Eastern
- What Minis have you?: 1983 Mini City 1000
- Contact:
Re: 1983 Mini City
Picked up a few panels locally yesterday, flitch repair panel, scuttle closing panels and a-post strengthening panels. Also picked up a bonnet that's in better condition than my squashed one.
Made a start on the inner wing repair using the new panels, took my time carefully cutting out the old panel piece by piece, and not to cut through the inner a-post like I done on passenger side
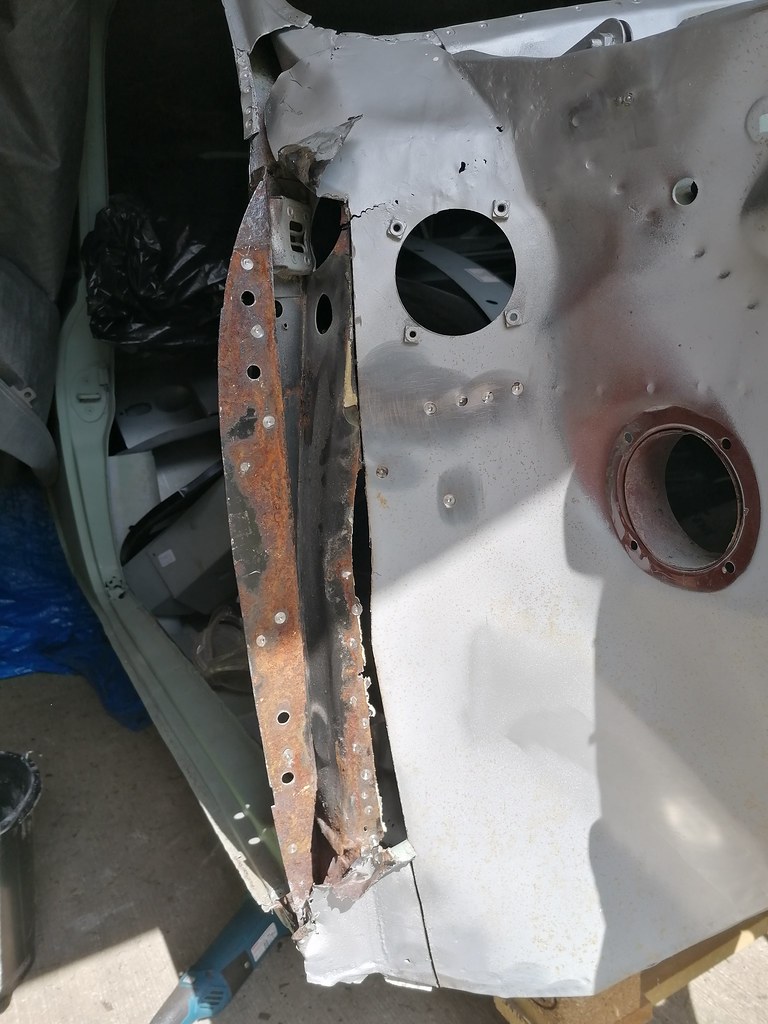

A-post was pretty solid with only a small bit of surface rust...
Got it cut nicely then set about welding it in, but still getting lots of pin holes and blow through.
Went over it again filling any pin holes then dressed it off with flap disk..

Used part of the upper flitch repair panel to close in the top, a few small triangular piece to complete it are need but was getting too stressed about the welding I called it a day...
Made a start on the inner wing repair using the new panels, took my time carefully cutting out the old panel piece by piece, and not to cut through the inner a-post like I done on passenger side

A-post was pretty solid with only a small bit of surface rust...
Got it cut nicely then set about welding it in, but still getting lots of pin holes and blow through.
Went over it again filling any pin holes then dressed it off with flap disk..
Used part of the upper flitch repair panel to close in the top, a few small triangular piece to complete it are need but was getting too stressed about the welding I called it a day...
-
Johnd101
- NON Member
- Posts: 18
- Joined: Sat Apr 03, 2021 8:23 pm
- Whats your location?: Kildare
- Region: Southern
- Contact:
Re: 1983 Mini City
Nice job. Always a nice feeling welding in new panels loving the build
-
colinf1
- NON Member
- Posts: 424
- Joined: Mon Aug 24, 2020 10:27 am
- Whats your location?: Dundalk
- Region: Eastern
- What Minis have you?: 1983 Mini City 1000
- Contact:
Re: 1983 Mini City
Came across another number stamped on the toe board yesterday, 50383.
Similar to the 470383 that was on the inner wing

Similar to the 470383 that was on the inner wing
-
colinf1
- NON Member
- Posts: 424
- Joined: Mon Aug 24, 2020 10:27 am
- Whats your location?: Dundalk
- Region: Eastern
- What Minis have you?: 1983 Mini City 1000
- Contact:
Re: 1983 Mini City
Got 1 front hub reassembled with new ball joints and wheel bearings, drive flange was a bit tight to get in, but eventually got there.
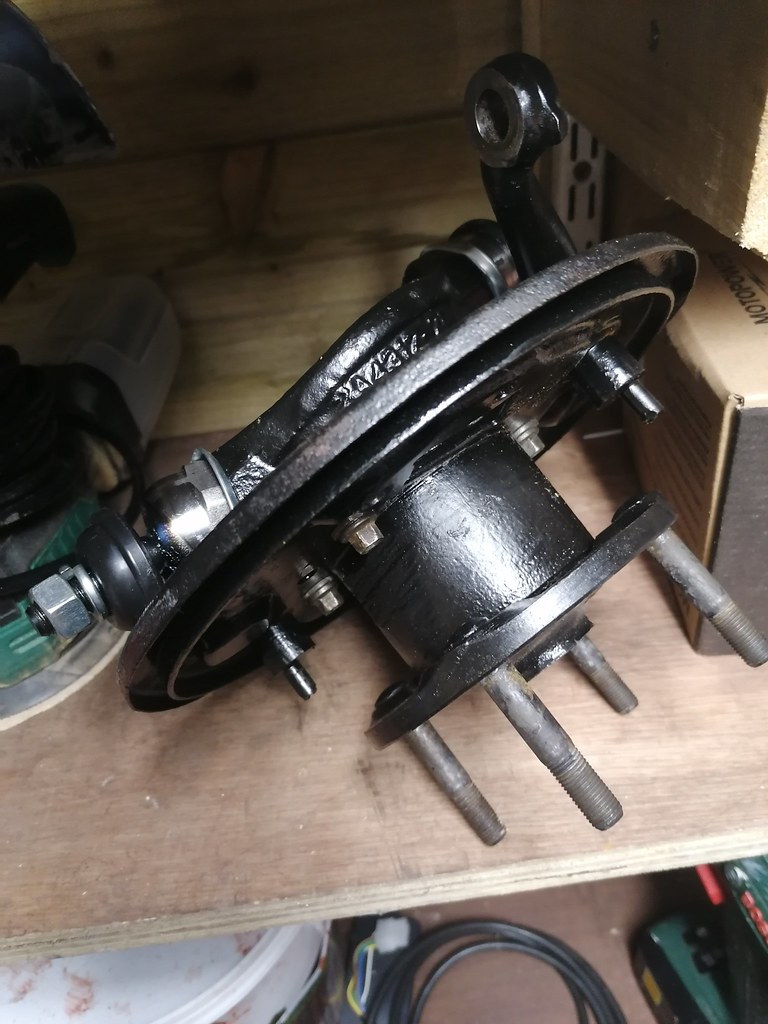
Then decided to finish 1 radius arm, didn't get much further than getting the backing plate offered up then struggling to find the right nuts and bolts...hmmm gonna take a while to identify all these...

Thankfully the majority of the bolts are bagged up and labelled, so just have to sort these and chuck the ones that I have replacements for...
Then decided to finish 1 radius arm, didn't get much further than getting the backing plate offered up then struggling to find the right nuts and bolts...hmmm gonna take a while to identify all these...
Thankfully the majority of the bolts are bagged up and labelled, so just have to sort these and chuck the ones that I have replacements for...
-
woody
- IMOC Paid Member
- Posts: 2819
- Joined: Mon Feb 07, 2005 11:55 pm
- Whats your location?: Drogheda
- Region: Eastern
- What Minis have you?: Traveller
Turbo
Hornet
Equinox
MINI Clubman - Location: LOUTH
- Contact:
Re: 1983 Mini City
The two bolts on your handbrake cable bracket also hold on the backplate with a washer between them if I remember right.
TECHNICAL MODERATOR
-
ctwomey
- NON Member
- Posts: 297
- Joined: Thu Jan 03, 2019 9:44 am
- Whats your location?: Ballybrittas, Co. Laois
- Region: Eastern
- What Minis have you?: I owned a 1978 Mini 850 when I was in my late teens. I owned a 1986 Mini Chelsea that I imported from the UK. Also owned a 1982 MG Metro that was bored out to 1293. Restoring a 1981 Dublin Mini City.
- Contact:
Re: 1983 Mini City
I just dismantled mine this morning and confirm the 5/16" washers behind the hand brake bracket.
Worth also buying a bunch of new bolts and nuts as those rusty ones have lost their zinc coating and will just keep on rusting. If you make a list of what nuts and bolts you need and send on to Hassetts in Limerick they will send it fairly quickly in the post,
-
colinf1
- NON Member
- Posts: 424
- Joined: Mon Aug 24, 2020 10:27 am
- Whats your location?: Dundalk
- Region: Eastern
- What Minis have you?: 1983 Mini City 1000
- Contact:
Re: 1983 Mini City
Still working my way through the nuts and bolts, have the vast majority of them sorted now, but struggling with these ones with a special washer.
5/16" and just over 2" long, I've 4 of the special washers and 2 bolts....
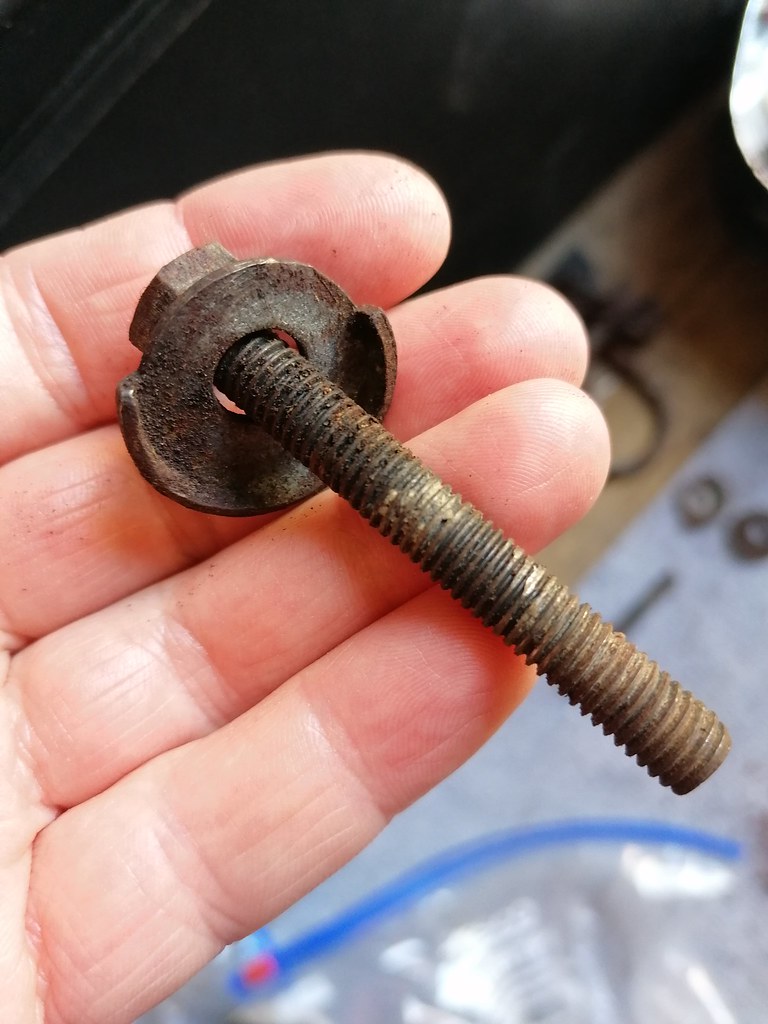
Thanks for any help...
5/16" and just over 2" long, I've 4 of the special washers and 2 bolts....
Thanks for any help...
-
NeilRichmond
- NON Member
- Posts: 15
- Joined: Wed Feb 10, 2021 5:38 pm
- Whats your location?: Mayo
- Region: Western
- Location: Co Mayo
- Contact:
Re: 1983 Mini City
I have probably 99% of bolts - washers and nuts that you would need for your rebuilding.
Can't think where that particular washer you have in your hand there fits, that bolt looks UNC too
I will put the link to the shop below if you wanted to have a look, not all the bolts I have are listed, but I do have them
https://www.richmondclassicscarparts.ie/
Can't think where that particular washer you have in your hand there fits, that bolt looks UNC too
I will put the link to the shop below if you wanted to have a look, not all the bolts I have are listed, but I do have them
https://www.richmondclassicscarparts.ie/
-
woody
- IMOC Paid Member
- Posts: 2819
- Joined: Mon Feb 07, 2005 11:55 pm
- Whats your location?: Drogheda
- Region: Eastern
- What Minis have you?: Traveller
Turbo
Hornet
Equinox
MINI Clubman - Location: LOUTH
- Contact:
Re: 1983 Mini City
Bolts and washers and should be two nuts for the exhaust to manifold clamp.
TECHNICAL MODERATOR
-
colinf1
- NON Member
- Posts: 424
- Joined: Mon Aug 24, 2020 10:27 am
- Whats your location?: Dundalk
- Region: Eastern
- What Minis have you?: 1983 Mini City 1000
- Contact:
Re: 1983 Mini City
Got some 50x50 box section off cuts and some pipe to make up a rotisserie. Got it all made up today and put the shell on it, but didn't work out as I hoped, looks like the 2 pipes are not inline so when it turns it moves the stands.
It also turns out I don't have enough space in the shed to have it on the rotisserie! Can't close the doors and it right back against back wall!
Took it back off and have the shell back on a pallet now, considering my next move as I don't have enough space to work on it.
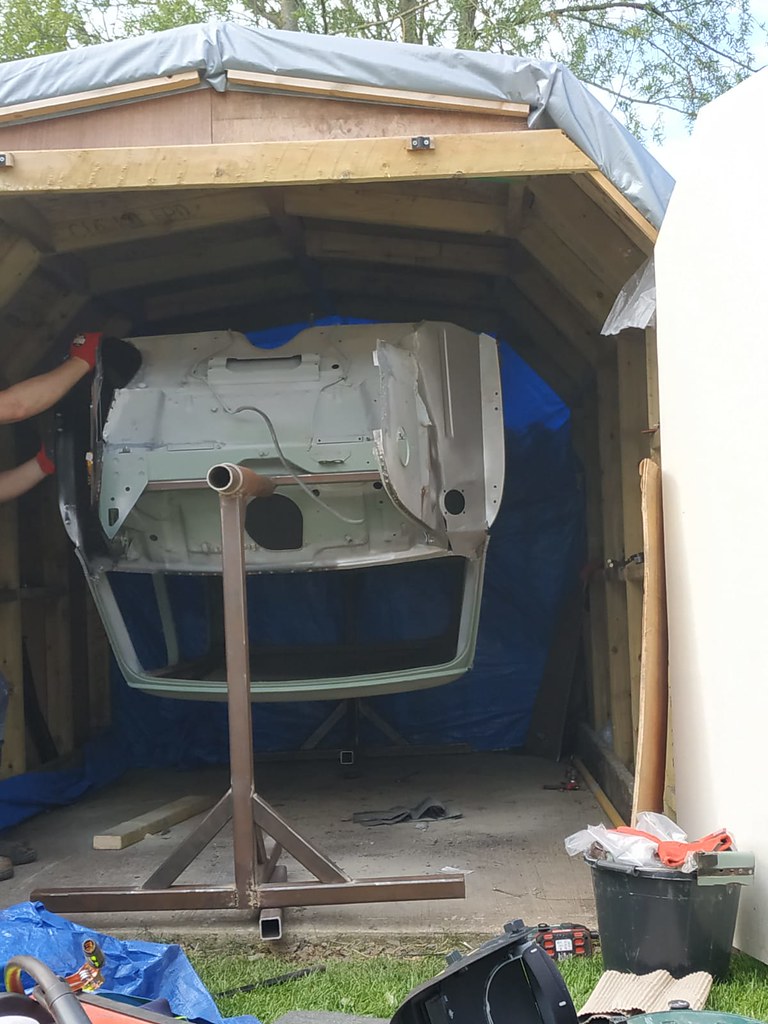
It also turns out I don't have enough space in the shed to have it on the rotisserie! Can't close the doors and it right back against back wall!
Took it back off and have the shell back on a pallet now, considering my next move as I don't have enough space to work on it.
Who is online
Users browsing this forum: No registered users and 3 guests