Page 7 of 13
Re: 1981 Mini City 1000
Posted: Sat Feb 19, 2022 7:54 pm
by colinf1
There looking great, fair play diy'ing them!
Did you have to use the metal tape for masking off?
Re: 1981 Mini City 1000
Posted: Sat Feb 19, 2022 9:17 pm
by ctwomey
colinf1 wrote: ↑Sat Feb 19, 2022 7:54 pm
Did you have to use the metal tape for masking off?
I just used blue masking tape. It cooks in the oven and becomes brittle and then can be removed with a sharp Stanley blade.
Re: 1981 Mini City 1000
Posted: Sun Feb 20, 2022 7:56 pm
by ctwomey
Some more powder coating today. Weather was horrible so glad to be tucked away in the garage for a few hours.
Re: 1981 Mini City 1000
Posted: Sat Feb 26, 2022 8:31 pm
by ctwomey
Front upper arms, rear hubs and rear arms powder coated today.
Re: 1981 Mini City 1000
Posted: Sun Feb 27, 2022 10:48 pm
by colinf1
Looking great!
Have you much more to powder coat?
Re: 1981 Mini City 1000
Posted: Sun Feb 27, 2022 11:27 pm
by ctwomey
colinf1 wrote: ↑Sun Feb 27, 2022 10:48 pm
Looking great!
Have you much more to powder coat?
All suspension parts are done now but I need to send the subframes and petrol tank off this week as the oven isn’t big enough for those.
I am sure there will be lots of other parts to powder coat when I start reassembling but I have the equipment to blast and powder now.
Re: 1981 Mini City 1000
Posted: Sun Feb 27, 2022 11:28 pm
by ctwomey
Next up is nickel zinc electroplating

Re: 1981 Mini City 1000
Posted: Fri Mar 04, 2022 10:34 am
by ctwomey
Heavy pitting on the fuel tank. Managed to weld it up using a curved piece of copper behind the steel to prevent blow through. Really happy with the results.
Re: 1981 Mini City 1000
Posted: Sat Mar 26, 2022 10:22 pm
by ctwomey
Some more powder coating and rebuilding of pedal box.
Re: 1981 Mini City 1000
Posted: Sun Mar 27, 2022 7:41 pm
by colinf1
I see you've even done the rear floor ashtray!!
I put mine straight in the bin, hate to see ashtrays in cars.
Pedal box looks great, both my pedals had seized to the pin!
Re: 1981 Mini City 1000
Posted: Sun Mar 27, 2022 10:12 pm
by ctwomey
colinf1 wrote: ↑Sun Mar 27, 2022 7:41 pm
I see you've even done the rear floor ashtray!!
I put mine straight in the bin, hate to see ashtrays in cars.
It will never be used. I just want to keep the interior items.
I will be putting back as much of the original interior as possible e.g. houndstooth seats etc.
The only non-original item that I will be changing will be converting from a round centre speedo to the oval centre speedo so I can include the oil pressure and temp gauges.
Re: 1981 Mini City 1000
Posted: Wed Mar 30, 2022 2:58 pm
by ctwomey
Pickup the subframes and petrol tank from the Carlow Coating.
Can start checking fitment with the new bushes prior to assembly.
Re: 1981 Mini City 1000
Posted: Thu Mar 31, 2022 9:24 pm
by ctwomey
Started assembling the rear subframe. Did a quick install first to ensure no issues.
Re: 1981 Mini City 1000
Posted: Tue Apr 05, 2022 10:39 pm
by ctwomey
For those that didn’t notice in the previous photo I put the back plates on the wrong side. Fixed now.
Started on the front subframe assembly
Re: 1981 Mini City 1000
Posted: Mon Apr 11, 2022 10:54 pm
by ctwomey
Installed the MiniSpares EVO cones into the front subframe. Quite a bit of compression required to get the original cone in after.
Used the fly wheel puller with an M14 high tensile threaded bar to make a homemade cone compressor. Now that the garage is wired for internet was able to stream The Masters in the background
Re: 1981 Mini City 1000
Posted: Wed Apr 13, 2022 10:58 am
by Billy
Multi-tasking
Re: 1981 Mini City 1000
Posted: Sun Jun 05, 2022 10:38 pm
by ctwomey
Haven’t posted in a while. Being doing a few odd bits here and there on the car. Last couple of days repairing the drivers side quarter panel with some success.
Re: 1981 Mini City 1000
Posted: Mon Jun 06, 2022 10:34 am
by ctwomey
Took a photo of what the penetration looks like from underneath the quarter panel. Need to wire brush it and spray it with some etch primer
Re: 1981 Mini City 1000
Posted: Fri Jul 15, 2022 10:55 am
by ctwomey
For some reason, I can't seem to attach images anymore to my thread or use the "Full Editor". Something seems broken since the cert got updated.
Re: 1981 Mini City 1000
Posted: Fri Jul 15, 2022 1:13 pm
by The Marcos Graveyard
Colin seems to be able to add pics.
Re: 1981 Mini City 1000
Posted: Fri Jul 15, 2022 4:10 pm
by colinf1
I'm adding my pictures via flickr bbcode, I think ctwomey is uploading to the forum and embedding them.
I think there are a few kinks to work out from the update to the website..
Re: 1981 Mini City 1000
Posted: Fri Jul 15, 2022 4:56 pm
by ctwomey
Thanks Colin for the tip about flickr bbcode. Issue seems to be with Full Editor and Preview.
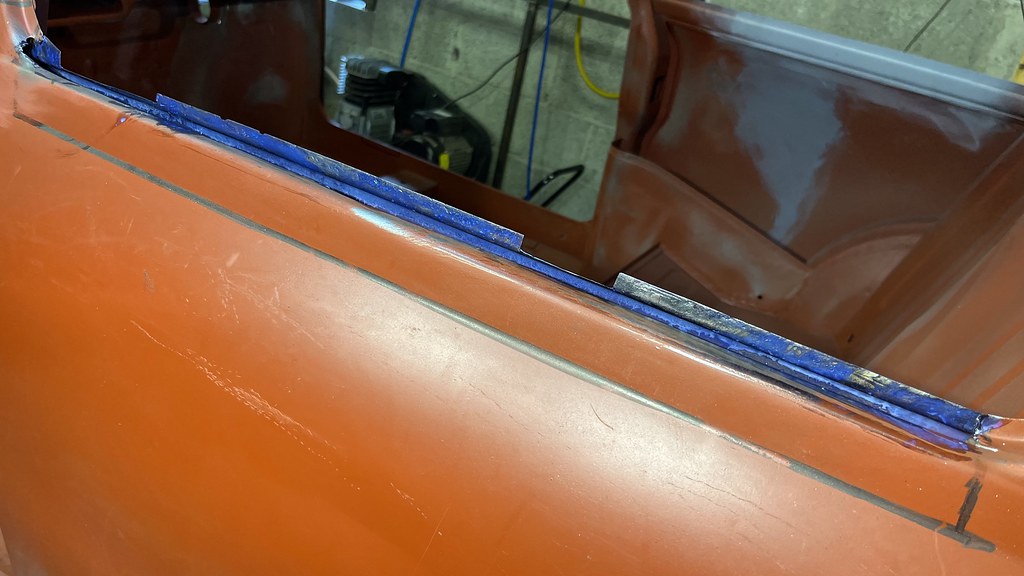
Finished off the driver's side quarter panel window repairs.
Next job is replace the passenger side quarter panel as the existing one is badly dented and the window opening is heavily corroded. I think more effort involved trying to fix the existing one rather than replace it.
Do you think I need to brace the shell in order to replace the quarter panel? fyi out sills are off too.
 IMG_9272
 IMG_9774
 IMG_9783
 IMG_9794
Re: 1981 Mini City 1000
Posted: Fri Jul 15, 2022 8:46 pm
by colinf1
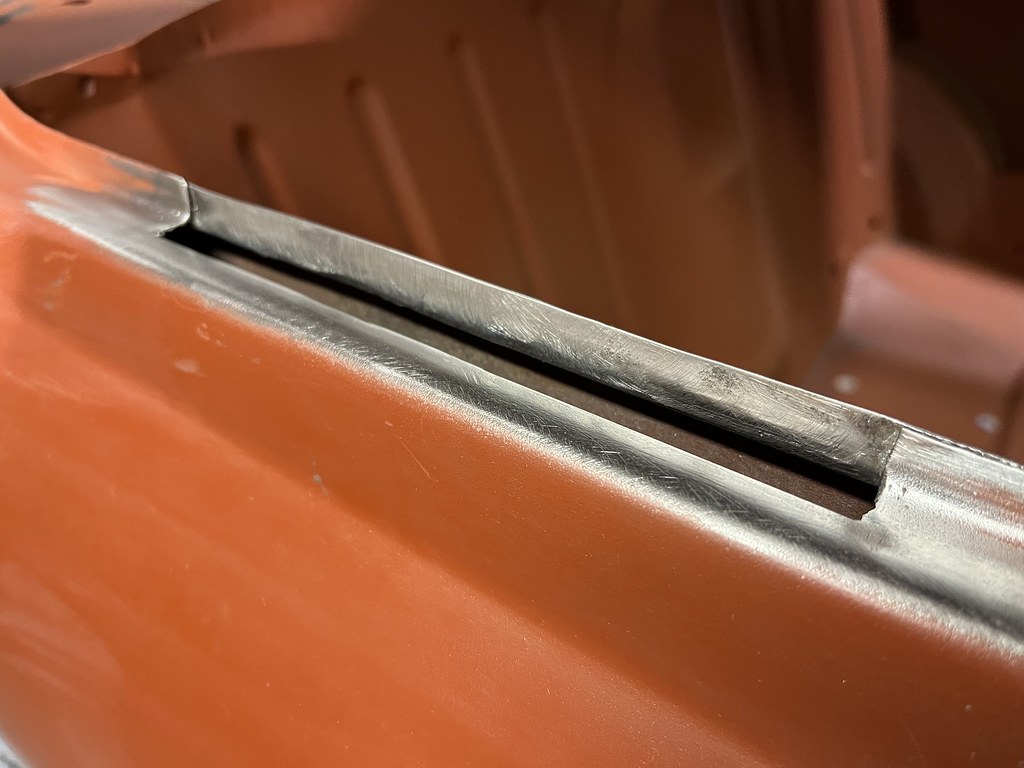
I would brace between the B-posts, just to be on the safe side incase anything moves. Do you have to do the quarter panel waist rail?
Welds are looking very neat!
Re: 1981 Mini City 1000
Posted: Fri Jul 15, 2022 9:01 pm
by ctwomey
colinf1 wrote: ↑Fri Jul 15, 2022 8:46 pm I would brace between the B-posts, just to be on the safe side incase anything moves. Do you have to do the quarter panel waist rail? Welds are looking very neat!
Cheers, I have some small box section that I can make a brace with. The waist rails are in decent shape, I just need to replace some of the lip that spot welds onto the quarter panel. Will post a picture when I detach the upper part of the quarter panel from that section.
Re: 1981 Mini City 1000
Posted: Sat Jul 16, 2022 12:45 pm
by ctwomey
The passenger side waist rail just needs some sections repaired.