
Welcome to the Irish Mini Owners Club Forum. Keep an eye out of on coming events!!!!
1983 Mini City
Moderators: spud1979, The Marcos Graveyard, Moderators
-
woody

- IMOC Paid Member
- Posts: 2820
- Joined: Mon Feb 07, 2005 11:55 pm
- Whats your location?: Drogheda
- Region: Eastern
- What Minis have you?: Traveller
Turbo
Hornet
Equinox
MINI Clubman - Location: LOUTH
- Contact:
Re: 1983 Mini City
every bit helps in the fight against the Irish climate. We'll have to drive our minis a lot more to get the temperature up
TECHNICAL MODERATOR

-
colinf1

- NON Member
- Posts: 428
- Joined: Mon Aug 24, 2020 10:27 am
- Whats your location?: Dundalk
- Region: Eastern
- What Minis have you?: 1983 Mini City 1000
- Contact:
-
colinf1
- NON Member
- Posts: 428
- Joined: Mon Aug 24, 2020 10:27 am
- Whats your location?: Dundalk
- Region: Eastern
- What Minis have you?: 1983 Mini City 1000
- Contact:
Re: 1983 Mini City
Had a look at the front shock absorber brackets today, they are extremely rusted on back sides, so I've drawn up replacements that I've had laser cut and folded.
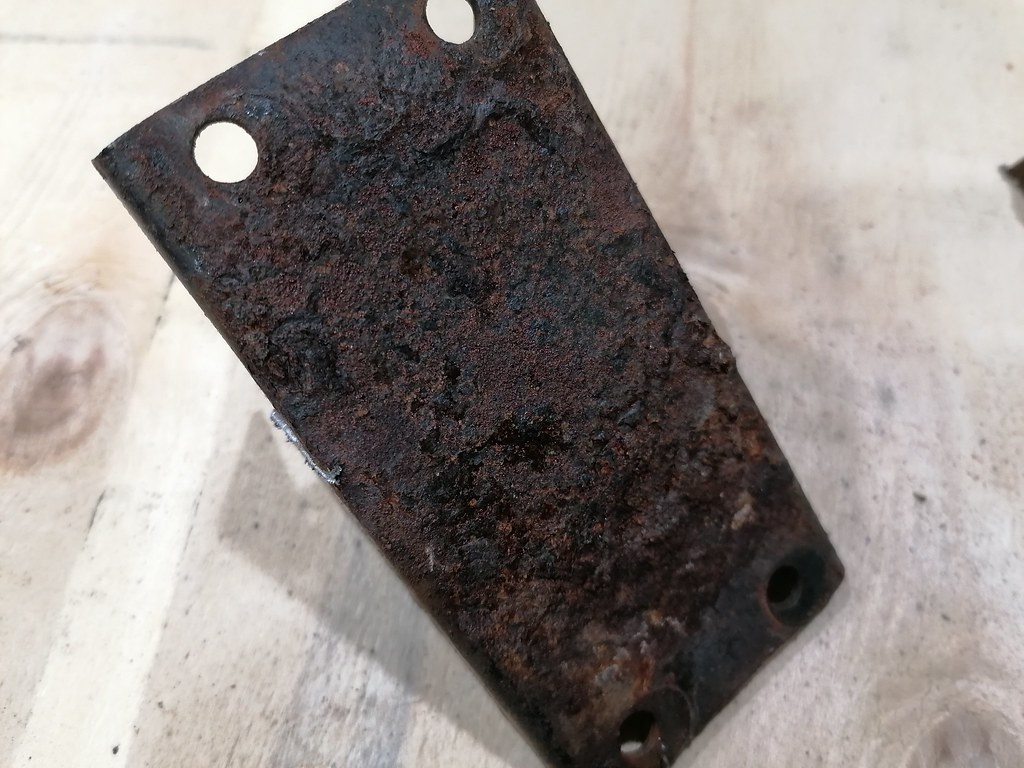
1st job was to salvage the pins, cut them out and cleaned off the remaining bracket...
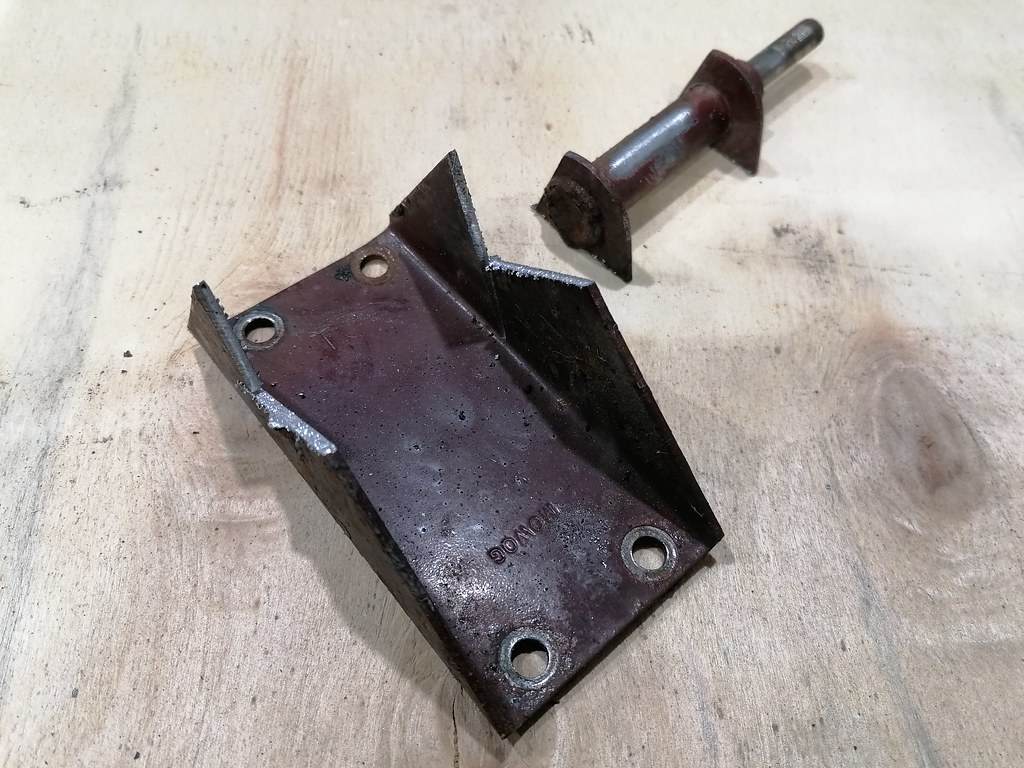
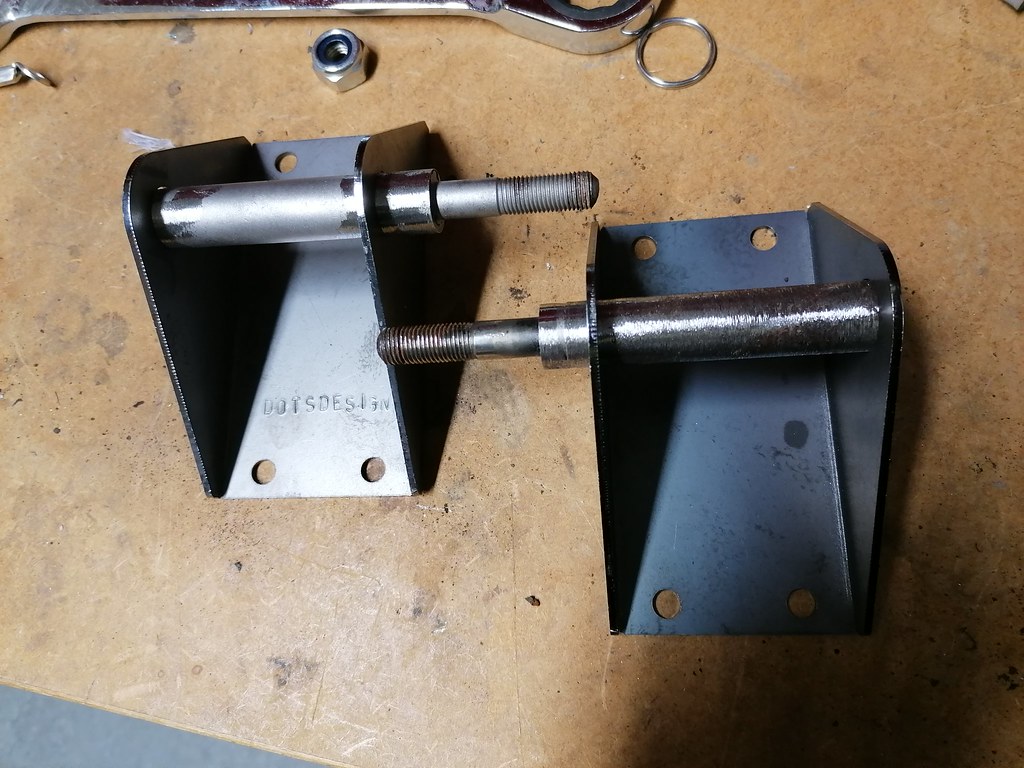
Then offered them up to new bracket and welded into place, no picture of the finished article yet as I have to linish back the welds and some splatter...
Got my minispares order delivered today, 3 big boxes

Unpacked it in the kitchen, soon ran out of floor space..

Nice new heritage inner wing, arrived in a big box by itself!
Hopefully I can fit everything inside the shell of the car, plus I've a tonne of cardboard packaging to try and fit in my recycling bin!
1st job was to salvage the pins, cut them out and cleaned off the remaining bracket...
Then offered them up to new bracket and welded into place, no picture of the finished article yet as I have to linish back the welds and some splatter...
Got my minispares order delivered today, 3 big boxes

Unpacked it in the kitchen, soon ran out of floor space..

Nice new heritage inner wing, arrived in a big box by itself!
Hopefully I can fit everything inside the shell of the car, plus I've a tonne of cardboard packaging to try and fit in my recycling bin!

-
colinf1
- NON Member
- Posts: 428
- Joined: Mon Aug 24, 2020 10:27 am
- Whats your location?: Dundalk
- Region: Eastern
- What Minis have you?: 1983 Mini City 1000
- Contact:
Re: 1983 Mini City
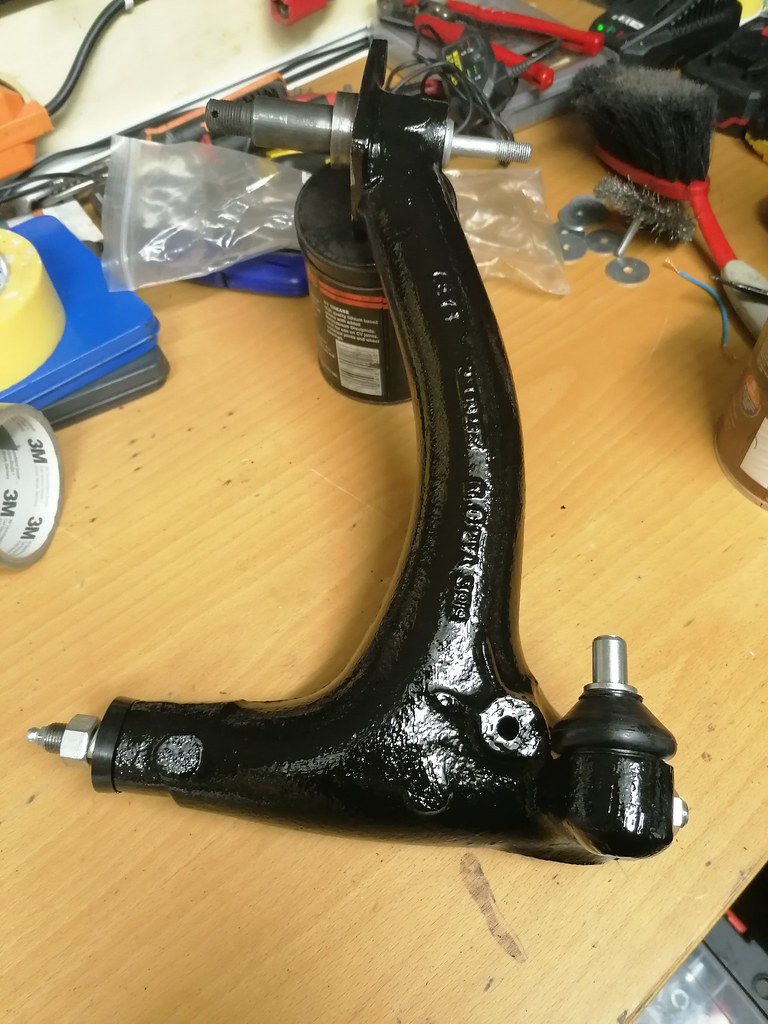
Reamed out the bush with the help of the 3d printed guide and pilot...
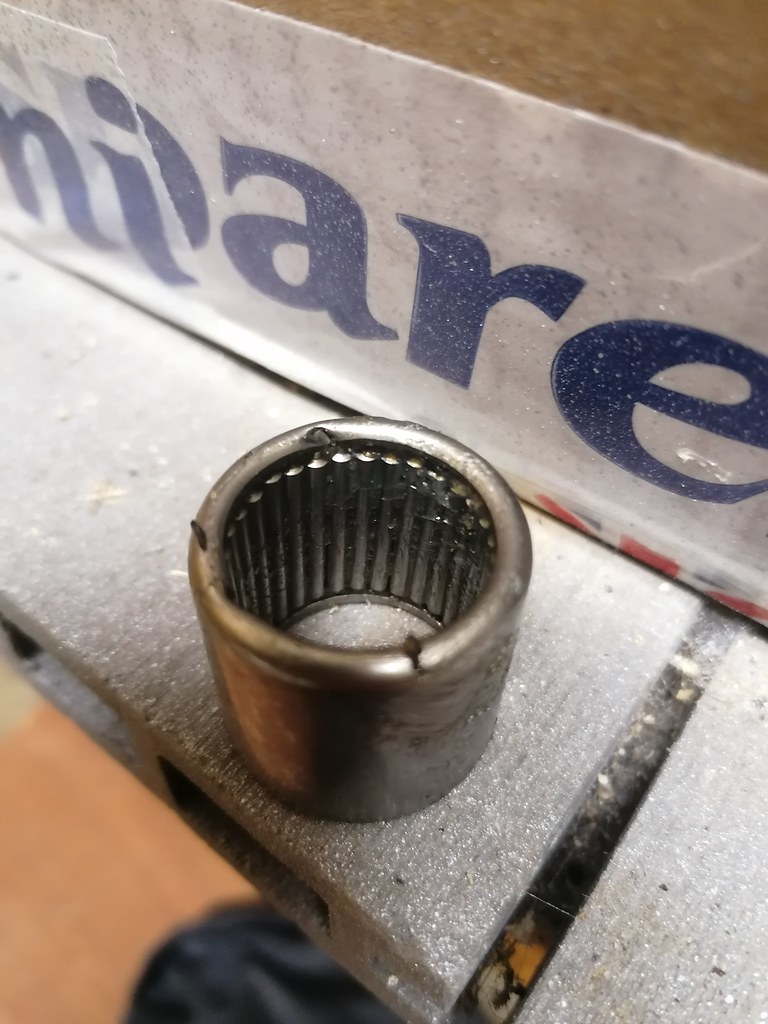
New bearing pressed in with the help of M16 threaded bar....but looked around and noticed the plastic sleeve...doh! Forgot to put it in...
Tried to tap out the bearing gently but wasn't successful, pinched a bit of the casing and caught one of the needles.
You can see one of the needles pushed outwards against the casing..

Took the bearing out of the repair kit for the opposite side to at least get one side finished.
All assembled and touched up any paint chips...
New bearing pressed in with the help of M16 threaded bar....but looked around and noticed the plastic sleeve...doh! Forgot to put it in...
Tried to tap out the bearing gently but wasn't successful, pinched a bit of the casing and caught one of the needles.
You can see one of the needles pushed outwards against the casing..
Took the bearing out of the repair kit for the opposite side to at least get one side finished.
All assembled and touched up any paint chips...
-
colinf1
- NON Member
- Posts: 428
- Joined: Mon Aug 24, 2020 10:27 am
- Whats your location?: Dundalk
- Region: Eastern
- What Minis have you?: 1983 Mini City 1000
- Contact:
Re: 1983 Mini City
Got a few hours at the mini today, it was a toss up between cleaning the shed or doing something on the car...
Decided to start taking off the front end, drilled out all the spot welds on the drivers wing to avoid any further damage to the inner wing. Passenger side was easier as I just cut through the inner wing.
I didn't even need to do much to get passenger A panel off, literally fell off after I removed wing.

Inner wing was very difficult to remove, thanks to the dodgy repair that had been done. A patch was weld to the inner and outer A posts, then was losing light so couldn't see where spot welds where along floor panel, so nipped it off an inch or so into the inner wing.
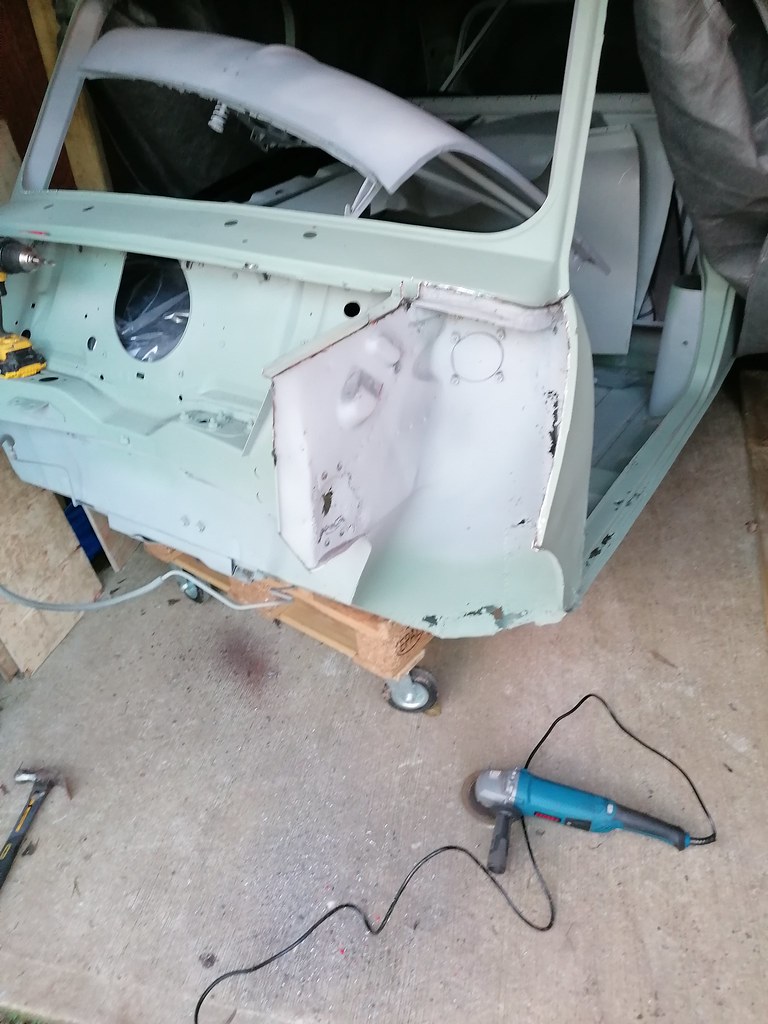
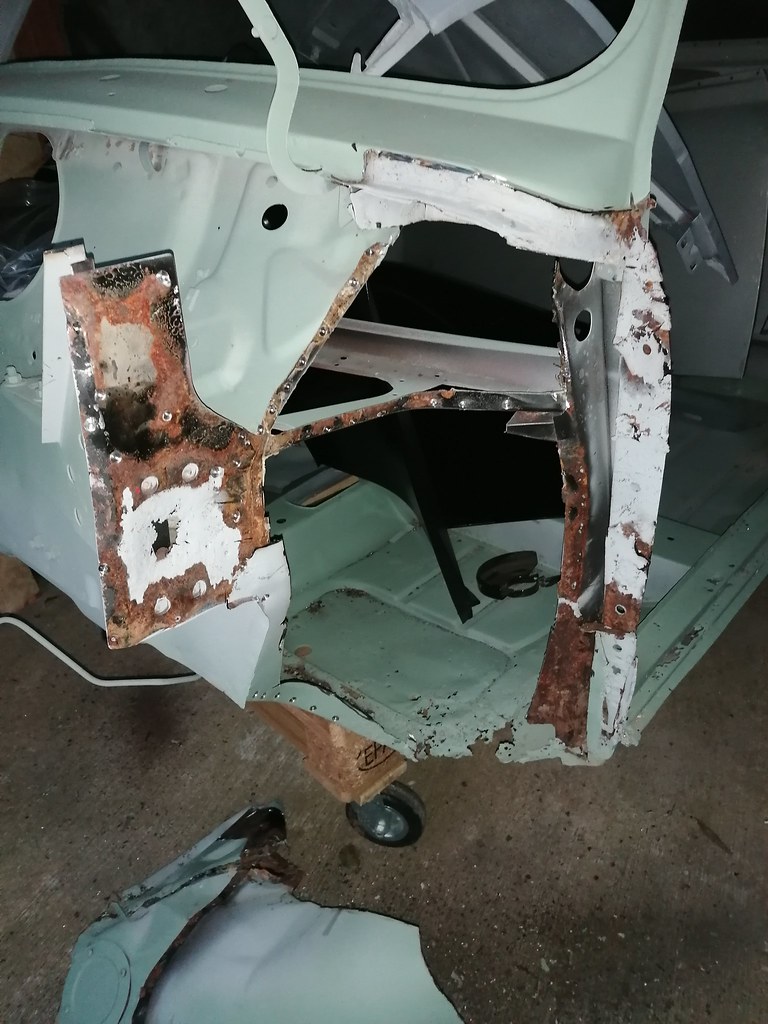
A bit of cleaning up to do on the cross member, next I'm planning on removing the scuttle panel to get better access to the top of the inner wings and closing panels
Decided to start taking off the front end, drilled out all the spot welds on the drivers wing to avoid any further damage to the inner wing. Passenger side was easier as I just cut through the inner wing.
I didn't even need to do much to get passenger A panel off, literally fell off after I removed wing.
Inner wing was very difficult to remove, thanks to the dodgy repair that had been done. A patch was weld to the inner and outer A posts, then was losing light so couldn't see where spot welds where along floor panel, so nipped it off an inch or so into the inner wing.
A bit of cleaning up to do on the cross member, next I'm planning on removing the scuttle panel to get better access to the top of the inner wings and closing panels
-
ctwomey
- NON Member
- Posts: 298
- Joined: Thu Jan 03, 2019 9:44 am
- Whats your location?: Ballybrittas, Co. Laois
- Region: Eastern
- What Minis have you?: I owned a 1978 Mini 850 when I was in my late teens. I owned a 1986 Mini Chelsea that I imported from the UK. Also owned a 1982 MG Metro that was bored out to 1293. Restoring a 1981 Dublin Mini City.
- Contact:
Re: 1983 Mini City
Just a quick question, did the shot blasting of the shell remove the seam sealer everywhere ?
Just seen your latest post. Great work today.
Just seen your latest post. Great work today.
-
colinf1
- NON Member
- Posts: 428
- Joined: Mon Aug 24, 2020 10:27 am
- Whats your location?: Dundalk
- Region: Eastern
- What Minis have you?: 1983 Mini City 1000
- Contact:
Re: 1983 Mini City
I think it got rid of the vast majority of it, I'll double check in a few places tomorrow.
Thanks for the complement, gives me good motivation to keep at it!
It is a lot of work, but best to do it right rather than a bodge job like what's been done before.
I think I need to get some bracing into the shell before going any further into the door step or floor
-
colinf1
- NON Member
- Posts: 428
- Joined: Mon Aug 24, 2020 10:27 am
- Whats your location?: Dundalk
- Region: Eastern
- What Minis have you?: 1983 Mini City 1000
- Contact:
Re: 1983 Mini City
Had a look at this earlier, yes the blasting got rid of the seam sealer everywhere.
-
ctwomey
- NON Member
- Posts: 298
- Joined: Thu Jan 03, 2019 9:44 am
- Whats your location?: Ballybrittas, Co. Laois
- Region: Eastern
- What Minis have you?: I owned a 1978 Mini 850 when I was in my late teens. I owned a 1986 Mini Chelsea that I imported from the UK. Also owned a 1982 MG Metro that was bored out to 1293. Restoring a 1981 Dublin Mini City.
- Contact:
Re: 1983 Mini City
That's great Colin. It's an absolute pain to remove. So I can just concentrate on the repair areas for now.
-
colinf1
- NON Member
- Posts: 428
- Joined: Mon Aug 24, 2020 10:27 am
- Whats your location?: Dundalk
- Region: Eastern
- What Minis have you?: 1983 Mini City 1000
- Contact:
Re: 1983 Mini City
Picked up the subframes that got reblasted, but it's too cold to take them from car to shed, so they can stay in the car for now..
-
ctwomey
- NON Member
- Posts: 298
- Joined: Thu Jan 03, 2019 9:44 am
- Whats your location?: Ballybrittas, Co. Laois
- Region: Eastern
- What Minis have you?: I owned a 1978 Mini 850 when I was in my late teens. I owned a 1986 Mini Chelsea that I imported from the UK. Also owned a 1982 MG Metro that was bored out to 1293. Restoring a 1981 Dublin Mini City.
- Contact:
Re: 1983 Mini City
Oh it’s cold alright. Even in my garage using an air tool I can last about 1 hour. Ordered one of those propane blast heaters to warm the space up.
-
colinf1
- NON Member
- Posts: 428
- Joined: Mon Aug 24, 2020 10:27 am
- Whats your location?: Dundalk
- Region: Eastern
- What Minis have you?: 1983 Mini City 1000
- Contact:
Re: 1983 Mini City
Had planned on trying to get scuttle panel off today, bit ended up trying to sort the condensation in my attic, pretty wet up there even though all vents are clear.
Stuck a dehumidifier up there see if that helps, think it may be caused by immersion venting into the cold water tank so I've disabled the timer for now.
Moved all my mini parts to the south facing side of attic, it's perfectly dry!
Stuck a dehumidifier up there see if that helps, think it may be caused by immersion venting into the cold water tank so I've disabled the timer for now.
Moved all my mini parts to the south facing side of attic, it's perfectly dry!
-
colinf1
- NON Member
- Posts: 428
- Joined: Mon Aug 24, 2020 10:27 am
- Whats your location?: Dundalk
- Region: Eastern
- What Minis have you?: 1983 Mini City 1000
- Contact:
Re: 1983 Mini City
Tried cleaning the original headliner and rear covering panels, both covered in red overspray and contact adhesive on the back sides.
No joy, contact adhesive will come off with white spirit but the staining that has gone through the preferrated material and the overspray is just too much to try and save it, time for the bin unfortunately.
Even it rods are a bit rusty, need a good cleaning but salvageable.
No joy, contact adhesive will come off with white spirit but the staining that has gone through the preferrated material and the overspray is just too much to try and save it, time for the bin unfortunately.
Even it rods are a bit rusty, need a good cleaning but salvageable.
-
colinf1
- NON Member
- Posts: 428
- Joined: Mon Aug 24, 2020 10:27 am
- Whats your location?: Dundalk
- Region: Eastern
- What Minis have you?: 1983 Mini City 1000
- Contact:
Re: 1983 Mini City
Some pictures of headliner and rear covering panels...
These almost came up as good as new...

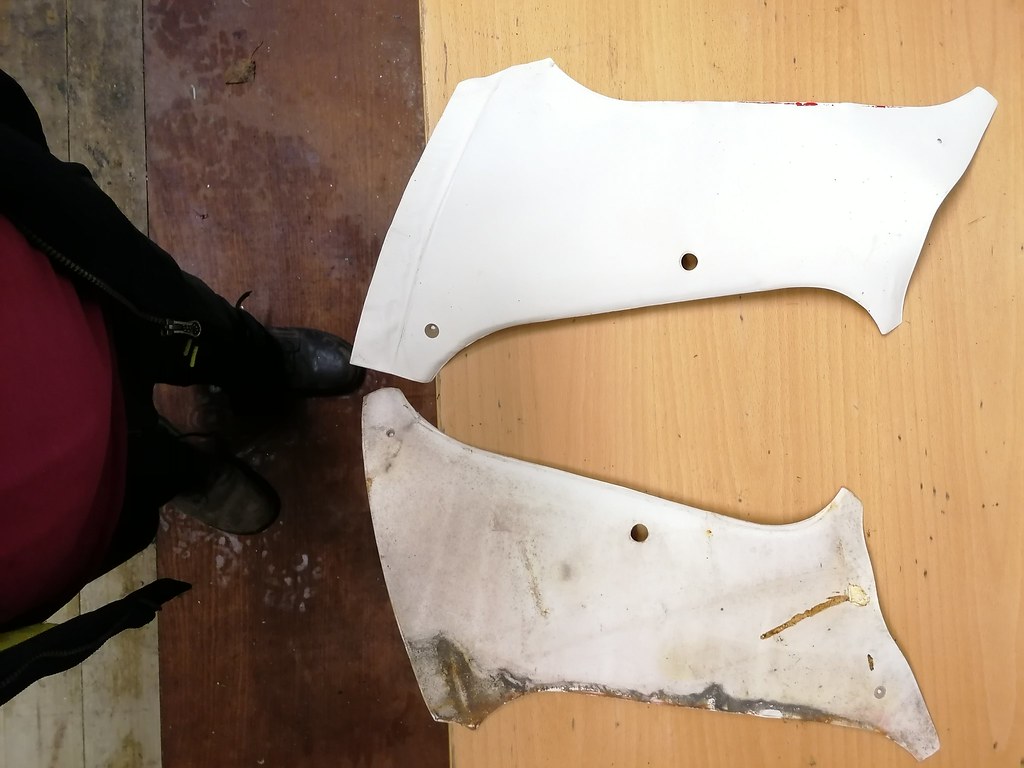
Someone was a bit heavy handed with the glue...

Overspray, glue weeping through and rust staining...

These almost came up as good as new...
Someone was a bit heavy handed with the glue...
Overspray, glue weeping through and rust staining...
-
colinf1
- NON Member
- Posts: 428
- Joined: Mon Aug 24, 2020 10:27 am
- Whats your location?: Dundalk
- Region: Eastern
- What Minis have you?: 1983 Mini City 1000
- Contact:
Re: 1983 Mini City
Picked up a mig welder in the week, a Swp 150, wasn't a great start when I couldn't get the wire loaded due to a damaged liner, so back to the shop to get it sorted.
Have it set up ready to go, so hopefully get something welded tomorrow, think I'll start on the parcel shelf speaker hole repair, should be a simple square piece to weld in and dress it off - real practice rather than wasting wire and gas on test pieces...
Have it set up ready to go, so hopefully get something welded tomorrow, think I'll start on the parcel shelf speaker hole repair, should be a simple square piece to weld in and dress it off - real practice rather than wasting wire and gas on test pieces...
-
colinf1
- NON Member
- Posts: 428
- Joined: Mon Aug 24, 2020 10:27 am
- Whats your location?: Dundalk
- Region: Eastern
- What Minis have you?: 1983 Mini City 1000
- Contact:
Re: 1983 Mini City
Well, that didn't go as planned.... pigeon poo and no penetration...
Back to the bench with test pieces to figure out how to weld...even wasted a full bottle of gas....

-
ctwomey
- NON Member
- Posts: 298
- Joined: Thu Jan 03, 2019 9:44 am
- Whats your location?: Ballybrittas, Co. Laois
- Region: Eastern
- What Minis have you?: I owned a 1978 Mini 850 when I was in my late teens. I owned a 1986 Mini Chelsea that I imported from the UK. Also owned a 1982 MG Metro that was bored out to 1293. Restoring a 1981 Dublin Mini City.
- Contact:
Re: 1983 Mini City
Are you using one of those disposable bottles? If so get yourself a 10L or 20L bottle from stargas instead.
Remember with MIG the current is controlled by wire speed and arch length by the voltage switches.
Also switch to 0.6 if you are not already using it. And practice, practice, practice. All those old panels are great for testing.
Butt welding is going to require lower settings than plug welding.
Remember with MIG the current is controlled by wire speed and arch length by the voltage switches.
Also switch to 0.6 if you are not already using it. And practice, practice, practice. All those old panels are great for testing.
Butt welding is going to require lower settings than plug welding.
-
colinf1
- NON Member
- Posts: 428
- Joined: Mon Aug 24, 2020 10:27 am
- Whats your location?: Dundalk
- Region: Eastern
- What Minis have you?: 1983 Mini City 1000
- Contact:
Re: 1983 Mini City
Some more practice with welder today, decided to try and join the front end together again. Wasn't overly concerned about it lining up properly, just concentrating on good strong welds. Was also using gasless wire, wasn't too bad to use, just a bit fumey

Will turn it into a garden feature, maybe a bench or a planter...
Cleaned up around the inner LH wing and A post, getting the remaining pieces ground off. A post needs a small patch but is good otherwise, door jam panel also looks ok once cleaned. There was a lot of brazing around front part of the doorstep panel, would it have been like that from factory?
Wire brushed around the number a bit more today and revealed it was 8 not 6. So 470383 - suggests it's 03/1983 build date of shell. 47 part is a mystery, maybe production line or operator number?
-
colinf1
- NON Member
- Posts: 428
- Joined: Mon Aug 24, 2020 10:27 am
- Whats your location?: Dundalk
- Region: Eastern
- What Minis have you?: 1983 Mini City 1000
- Contact:
Re: 1983 Mini City
Sure is quiet around here...

Guess nobody is fancying going out to cold sheds and garages to do work...
I've been painting my front subframe, I'm on week 2 of doing it and just about got the 1st coat finished.
Had planned on getting them powder coated but haven't been able to get it to them
Guess nobody is fancying going out to cold sheds and garages to do work...
I've been painting my front subframe, I'm on week 2 of doing it and just about got the 1st coat finished.
Had planned on getting them powder coated but haven't been able to get it to them
-
colinf1
- NON Member
- Posts: 428
- Joined: Mon Aug 24, 2020 10:27 am
- Whats your location?: Dundalk
- Region: Eastern
- What Minis have you?: 1983 Mini City 1000
- Contact:
Re: 1983 Mini City
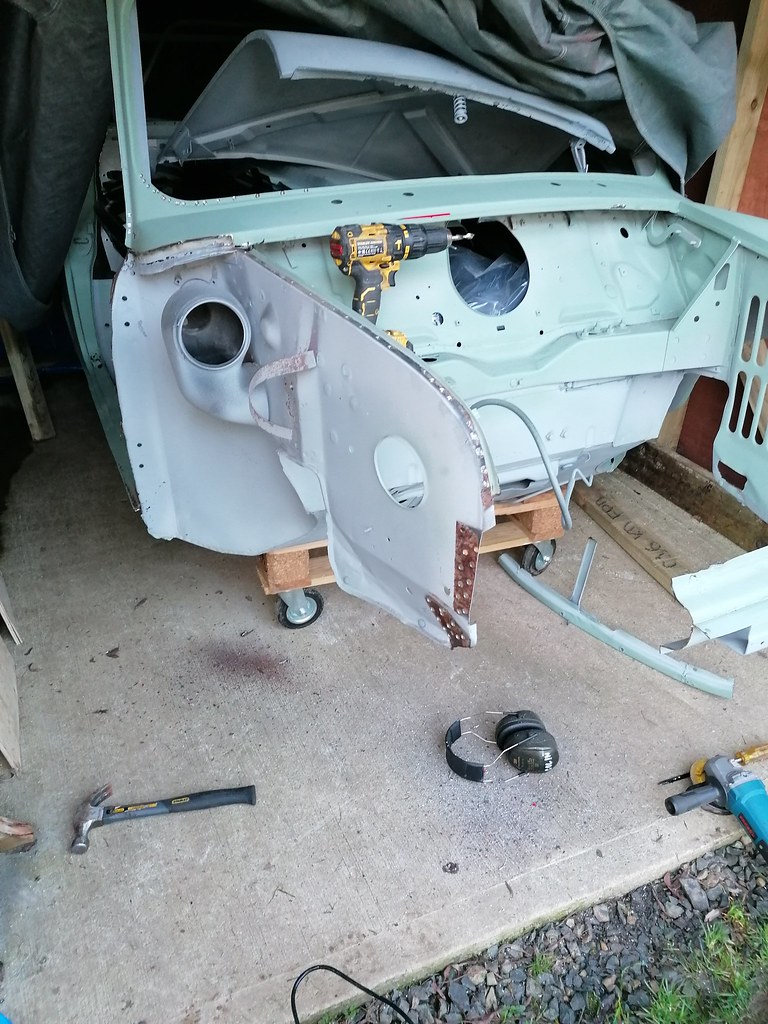
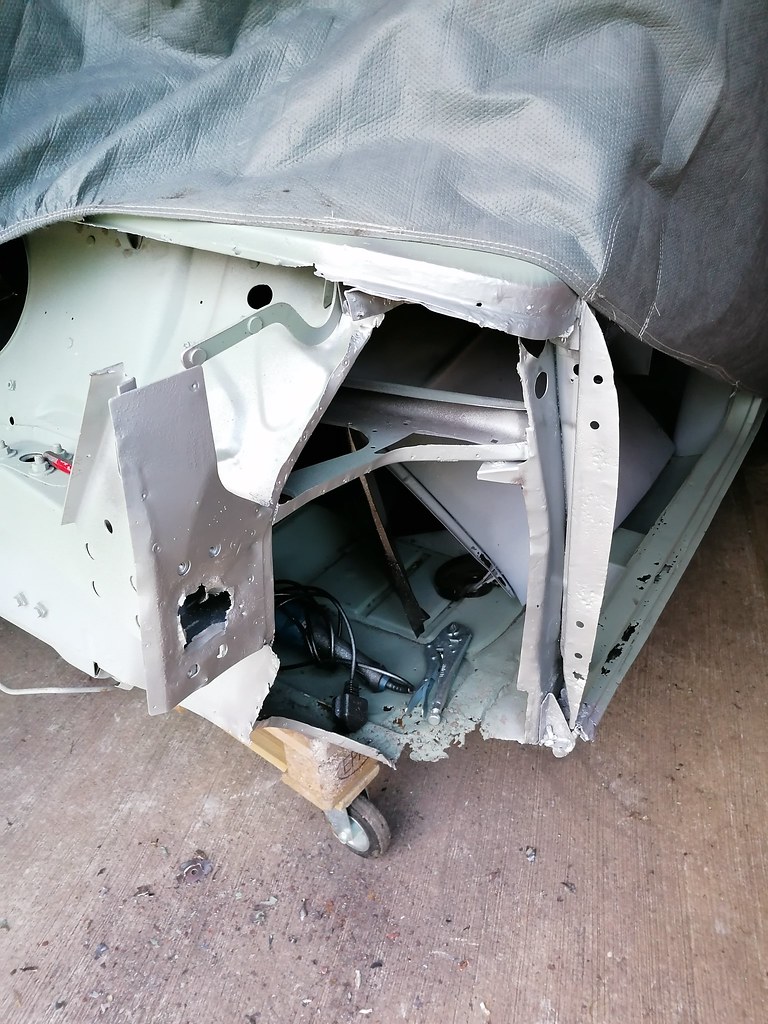
Got a few hours out at the car today, the 1st hour was spent pulling car out then trying to get it back on the skids as it came off slightly and the castor wheels immediately sunk in the grass....ughhh
Took off the scuttle panel to allow me to finish removing the last parts of inner wing.
Offered the new inner wing up, bolted it in at the door hinge panel, then set about trying to make it fit. There was a small captive nut above the shock mount, maybe for charcoal canister in later models? Ground it down flush as it was fouling in the cross-member..
Tried fitting up the rest of the front panels, a fair bit of fettling needed to get these into the correct locations..

Hopefully get a bit more done tomorrow if the weather is good..
Took off the scuttle panel to allow me to finish removing the last parts of inner wing.
Offered the new inner wing up, bolted it in at the door hinge panel, then set about trying to make it fit. There was a small captive nut above the shock mount, maybe for charcoal canister in later models? Ground it down flush as it was fouling in the cross-member..
Tried fitting up the rest of the front panels, a fair bit of fettling needed to get these into the correct locations..
Hopefully get a bit more done tomorrow if the weather is good..
-
woody
- IMOC Paid Member
- Posts: 2820
- Joined: Mon Feb 07, 2005 11:55 pm
- Whats your location?: Drogheda
- Region: Eastern
- What Minis have you?: Traveller
Turbo
Hornet
Equinox
MINI Clubman - Location: LOUTH
- Contact:
Re: 1983 Mini City
Depending on brand of panels there can be a little or a lot of fettling . Personally I like to put the front subframe in and use the front mounts as a sufferance. looks like its gona be too cold to work outside this week .
TECHNICAL MODERATOR
-
colinf1
- NON Member
- Posts: 428
- Joined: Mon Aug 24, 2020 10:27 am
- Whats your location?: Dundalk
- Region: Eastern
- What Minis have you?: 1983 Mini City 1000
- Contact:
Re: 1983 Mini City
Oh yes, much to cold... there isn't any room to work in the shed without doors open so not planning any work this week.
Yes, planning on putting in subframe to help with alignment. Have it half painted at the moment, so might get it near enough finished this week, then fit it for alignment then touch up any scratches that may happen when putting it on.
The inner wing is heritage panel, but seems to bit out of alignment with the shock mount holes. The wings and front panel are m machine, a few wee bumps that will need flattening on the seam folds.
The original bonnet catch panel has a stamp tag on it, what does this relate to? It's a bit rusty on one side so may reverse stamp directly on the new front panel.
-
colinf1
- NON Member
- Posts: 428
- Joined: Mon Aug 24, 2020 10:27 am
- Whats your location?: Dundalk
- Region: Eastern
- What Minis have you?: 1983 Mini City 1000
- Contact:
Re: 1983 Mini City
Got the front subframe refitted, well by the tower bolts for now. Need to find the bolts for front mounting points to offer up front panel.
My teardrop parts no longer have the rubber on them, but I did buy a poly fitting kit, do I just use the small bushings from that directly on the teardrop part?
My teardrop parts no longer have the rubber on them, but I did buy a poly fitting kit, do I just use the small bushings from that directly on the teardrop part?
Who is online
Users browsing this forum: Ahrefs [Bot] and 3 guests
