
Welcome to the Irish Mini Owners Club Forum. Keep an eye out of on coming events!!!!
1983 Mini City
Moderators: spud1979, The Marcos Graveyard, Moderators
-
woody

- IMOC Paid Member
- Posts: 2819
- Joined: Mon Feb 07, 2005 11:55 pm
- Whats your location?: Drogheda
- Region: Eastern
- What Minis have you?: Traveller
Turbo
Hornet
Equinox
MINI Clubman - Location: LOUTH
- Contact:
Re: 1983 Mini City
did you change any of the door rubbers or glass. earlier cars had thicker glass.
TECHNICAL MODERATOR

-
colinf1

- NON Member
- Posts: 421
- Joined: Mon Aug 24, 2020 10:27 am
- Whats your location?: Dundalk
- Region: Eastern
- What Minis have you?: 1983 Mini City 1000
- Contact:
Re: 1983 Mini City
I think I can see the issue, the regulator channel looks to be catching the rubber, so door card needs to come off and get in to rectify that. Door glass is the only unoriginal glass on the car, all others are late 1982 manufacturing date. - But I've rung a screw on the interior door lever, so need to remove that firstly!
Got a wiring diagram printed off at work, A3 enlarged over 8 more A3 pages and stuck up on the shed wall. Much easier than flicking between pages in Haynes manual.
Over the last 2 evenings I got most of the wiring connected up, then chasing some gremlins that appeared when I hooked up the battery. Headlight switch only worked sometimes, so took that apart and cleaned the internals, same with the hazard switch. The bulb on the hazard is only working sometimes, the hazards all worked then drivers side stopped for some reason, gonna take a look at the switch connector. Rear lamps had brake and marker light mixed up on drivers side, sorted now, then no side lights, wire from fuse box connection had started to fray, new connector sorted that...
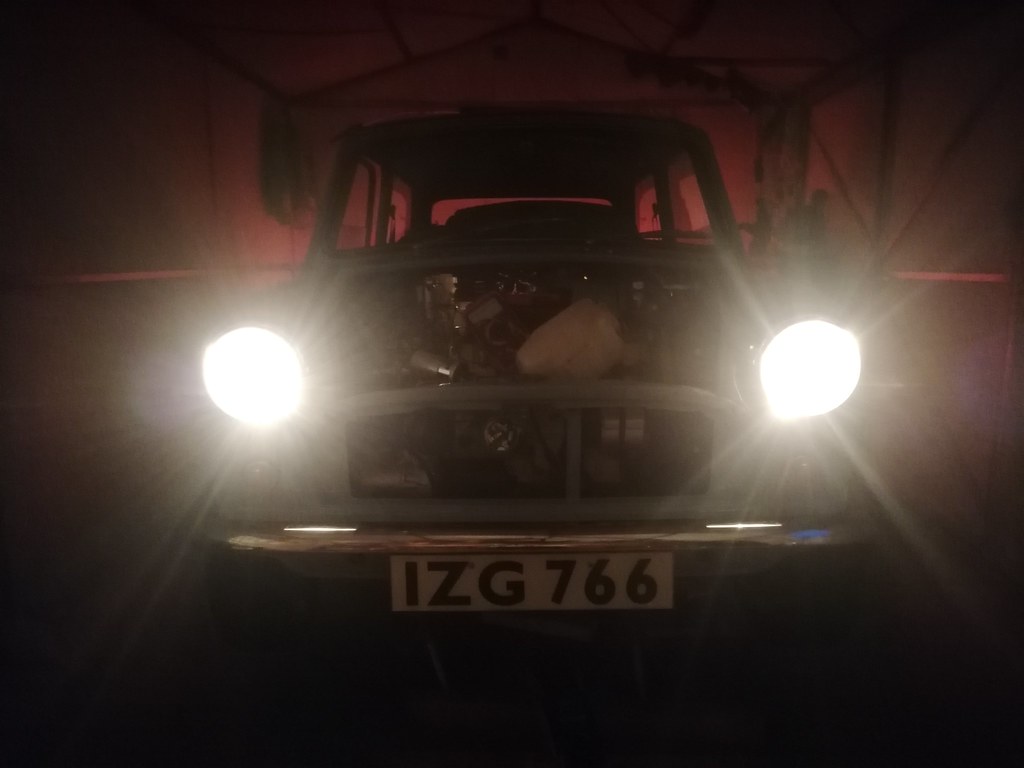

Surely these should be brighter...?
Also got washer pump and bottle on, motor needed a little persuasion to kick into life.
I need to look at the resistance wire for coil, part of it has been cut and replaced, so may replace it entirely and use the resistor that comes with the illumination coil.

-
ctwomey
- NON Member
- Posts: 296
- Joined: Thu Jan 03, 2019 9:44 am
- Whats your location?: Ballybrittas, Co. Laois
- Region: Eastern
- What Minis have you?: I owned a 1978 Mini 850 when I was in my late teens. I owned a 1986 Mini Chelsea that I imported from the UK. Also owned a 1982 MG Metro that was bored out to 1293. Restoring a 1981 Dublin Mini City.
- Contact:
Re: 1983 Mini City
The internal resistance of the coil used needs to match the setup of the car I.e.ballast or non-ballast. AC Dodd has a video on it on YouTube.
You are making great progress Colin.
You are making great progress Colin.
-
woody
- IMOC Paid Member
- Posts: 2819
- Joined: Mon Feb 07, 2005 11:55 pm
- Whats your location?: Drogheda
- Region: Eastern
- What Minis have you?: Traveller
Turbo
Hornet
Equinox
MINI Clubman - Location: LOUTH
- Contact:
Re: 1983 Mini City
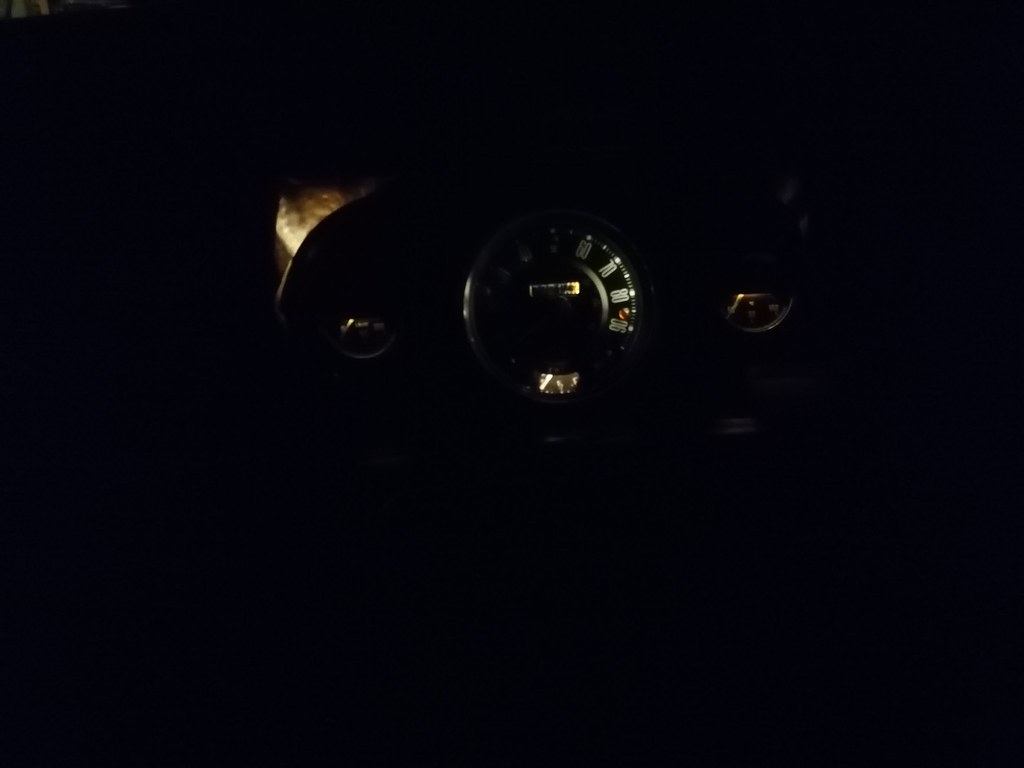
The speedo has 2 illumination bulbs, looks like one is not working.I have just checked the wiring diagrams and I don't think your car should have a ballast coil system.
TECHNICAL MODERATOR
-
colinf1
- NON Member
- Posts: 421
- Joined: Mon Aug 24, 2020 10:27 am
- Whats your location?: Dundalk
- Region: Eastern
- What Minis have you?: 1983 Mini City 1000
- Contact:
Re: 1983 Mini City
I have checked the voltage from fuse box to coil +, getting 12V, then I have the extra 12V ignition jump wire. Tracing back the pink/white wire revealed a small section had been chopped out and replaced with a piece of brown wire, so I guess the resistance part of the wire was cut out at some point. I am going to remove this PW wire and replace it entirely, running it through a 1.6ohms ballast resistor that came with the lumenation coil.
This is the coil I have got http://www.minispares.com/product/Class ... LB111.aspx
This is the coil I have got http://www.minispares.com/product/Class ... LB111.aspx
-
woody
- IMOC Paid Member
- Posts: 2819
- Joined: Mon Feb 07, 2005 11:55 pm
- Whats your location?: Drogheda
- Region: Eastern
- What Minis have you?: Traveller
Turbo
Hornet
Equinox
MINI Clubman - Location: LOUTH
- Contact:
Re: 1983 Mini City
The Pink/white wire is restive over its entire length ,ie ohms/meter. the last approx 2" has two connectors and I thought it should be White. The two connectors are male and female spades. To connect the wire to the fusebox you remove a White wire from the fusebox and connect to the male spade on the cable. Than you connect the female spade on the cable to the fusebox.
Be careful measuring voltage at the coil, unless the points are closed the restive wire will show 12 v. Volt drop only occurs when there is current flowing in a circuit.
Be careful measuring voltage at the coil, unless the points are closed the restive wire will show 12 v. Volt drop only occurs when there is current flowing in a circuit.
TECHNICAL MODERATOR
-
colinf1
- NON Member
- Posts: 421
- Joined: Mon Aug 24, 2020 10:27 am
- Whats your location?: Dundalk
- Region: Eastern
- What Minis have you?: 1983 Mini City 1000
- Contact:
Re: 1983 Mini City
Good few jobs ticked off the to-do list today.
New park switch fitted to wiper motor, motor fitted, arms removed and set to correct park position. All working nicely!
Fuel tank fitted, captive nut spun and broke the captive cage, so had to revert to getting a nut sitting in the ring end of a spanner and carefully lowered into place. Fuel pipe all connected.
Exhaust clamps removed, had the middle and rear brackets mixed up which was pulling it to the right, swapped around and all clamped in tightly. Bracket from the diff housing was too far away to pickup, but its very steady as it is.
Carb bolted back on, accelerator cable attached. Need to find the retainer for the choke cable. Upper and lower engine steadies installed.
Routed some heater pipe through bulkhead to matrix, but its kinking a tad too much as it bends to go onto the matrix.
Parcel shelf lining made and covered in vinyl, some vinyl covering on the wheel arches. Have a set of rear static seat belts to fit, so need to take trim panels off to get hole location a C pillar.
Lowered car to the floor, first time in nearly 3 years it was on its wheels. Hopefully the ride height settles down, bit high at the moment with new cones.
-
colinf1
- NON Member
- Posts: 421
- Joined: Mon Aug 24, 2020 10:27 am
- Whats your location?: Dundalk
- Region: Eastern
- What Minis have you?: 1983 Mini City 1000
- Contact:
Re: 1983 Mini City
A few more jobs done today, got the excess of the battery cable tidied up, it was getting pinched on the rear subframe, so had to undo the subframe slightly and wiggle it over a bit. Then trimmed it to length and the bit I cut off was enough for solenoid to starter motor.
Got brakes and clutch bled, with the help of my wife, perfectly suitable job for 6 months preggers :p
No sign of any weeping leaks, so hopefully it's all good. Clutch throwout also adjusted.
Hose connected to heater matrix, just the return hose to connect now.
Horn swapped out, original one wasn't showing any sign of life, and the spare was a 2 connector one, so made a small earth and connected it up.
Big tidy up done in shed, all tools sorted and bench cleared. Need to make up a choke cable connection as it wasn't attached when I got the car.
Dizzy cap attached and leads onto plugs, but still need to rotate then engine to find No.1 on rotor arm.
Nearly ready to start it...
-
woody
- IMOC Paid Member
- Posts: 2819
- Joined: Mon Feb 07, 2005 11:55 pm
- Whats your location?: Drogheda
- Region: Eastern
- What Minis have you?: Traveller
Turbo
Hornet
Equinox
MINI Clubman - Location: LOUTH
- Contact:
Re: 1983 Mini City
Just checking, the battery cable goes under and not over the rear subframe.
TECHNICAL MODERATOR
-
colinf1
- NON Member
- Posts: 421
- Joined: Mon Aug 24, 2020 10:27 am
- Whats your location?: Dundalk
- Region: Eastern
- What Minis have you?: 1983 Mini City 1000
- Contact:
Re: 1983 Mini City
I have it routed up beside the pipe line? I can get it pulled back down as its in the recess of the heelboard.
Is it the risk of movement in subframe cutting/wearing through cable sleeve?
Is it the risk of movement in subframe cutting/wearing through cable sleeve?
-
colinf1
- NON Member
- Posts: 421
- Joined: Mon Aug 24, 2020 10:27 am
- Whats your location?: Dundalk
- Region: Eastern
- What Minis have you?: 1983 Mini City 1000
- Contact:
Re: 1983 Mini City
Got a few hours at it today, decided it was time to get it out into the daylight...cue the Austin powers music...
WHY DIDN'T I GET A BIGGER SHED!!!!!

Lots of pulling and pushing to get it in and out, gonna need dolly's to be able to swing the rear around.
Got last hose connected to heater matrix, then attempted a start. Ran really rough for a few seconds then cut out. Went through the timing sequence in Haynes manual 3 times, the pipe for the oil pressure gauge was stopping me from getting the points set to just opening, but kept at it, double checking it all. Popped lid off float chamber and added more fuel, choke on, cranked and fired up, high idle speed but it's running.
Knocked it off and then noticed some smoke coming from clutch side of engine, quickly disconnect the battery, but its coming from inside the flywheel housing itself. No breather on this side, but 2 threaded holes on front side of it.
Not sure if this is normal for an initial start up?
Torqued up the front hub bearings then pushed it back into shed. An extra 50mm width and I could have parked it in straight and closes doors!!
WHY DIDN'T I GET A BIGGER SHED!!!!!
Lots of pulling and pushing to get it in and out, gonna need dolly's to be able to swing the rear around.
Got last hose connected to heater matrix, then attempted a start. Ran really rough for a few seconds then cut out. Went through the timing sequence in Haynes manual 3 times, the pipe for the oil pressure gauge was stopping me from getting the points set to just opening, but kept at it, double checking it all. Popped lid off float chamber and added more fuel, choke on, cranked and fired up, high idle speed but it's running.
Knocked it off and then noticed some smoke coming from clutch side of engine, quickly disconnect the battery, but its coming from inside the flywheel housing itself. No breather on this side, but 2 threaded holes on front side of it.
Not sure if this is normal for an initial start up?
Torqued up the front hub bearings then pushed it back into shed. An extra 50mm width and I could have parked it in straight and closes doors!!
-
woody
- IMOC Paid Member
- Posts: 2819
- Joined: Mon Feb 07, 2005 11:55 pm
- Whats your location?: Drogheda
- Region: Eastern
- What Minis have you?: Traveller
Turbo
Hornet
Equinox
MINI Clubman - Location: LOUTH
- Contact:
Re: 1983 Mini City
Yes the rear subframe is rummer mounted so constantly moving and will wear the insulation off the cable.
Well done on getting it running. If you can't get the dizzy in the right position because the vacuum advance is hitting the oil pipe you can turn the dizzy 90 deg clockwise and than move the leads one position anti clockwise.
Did you press the clutch in while the engine was running?
Well done on getting it running. If you can't get the dizzy in the right position because the vacuum advance is hitting the oil pipe you can turn the dizzy 90 deg clockwise and than move the leads one position anti clockwise.
Did you press the clutch in while the engine was running?
TECHNICAL MODERATOR
-
colinf1
- NON Member
- Posts: 421
- Joined: Mon Aug 24, 2020 10:27 am
- Whats your location?: Dundalk
- Region: Eastern
- What Minis have you?: 1983 Mini City 1000
- Contact:
Re: 1983 Mini City
No, didn't press clutch in yet. I've adjusted the throwout as per haynes, but I didnt have the
To get the vacuum past the oil pipe I pulled the dizzy body out slightly and that gave enough room to get it passed it, then got the points set to starting to open.
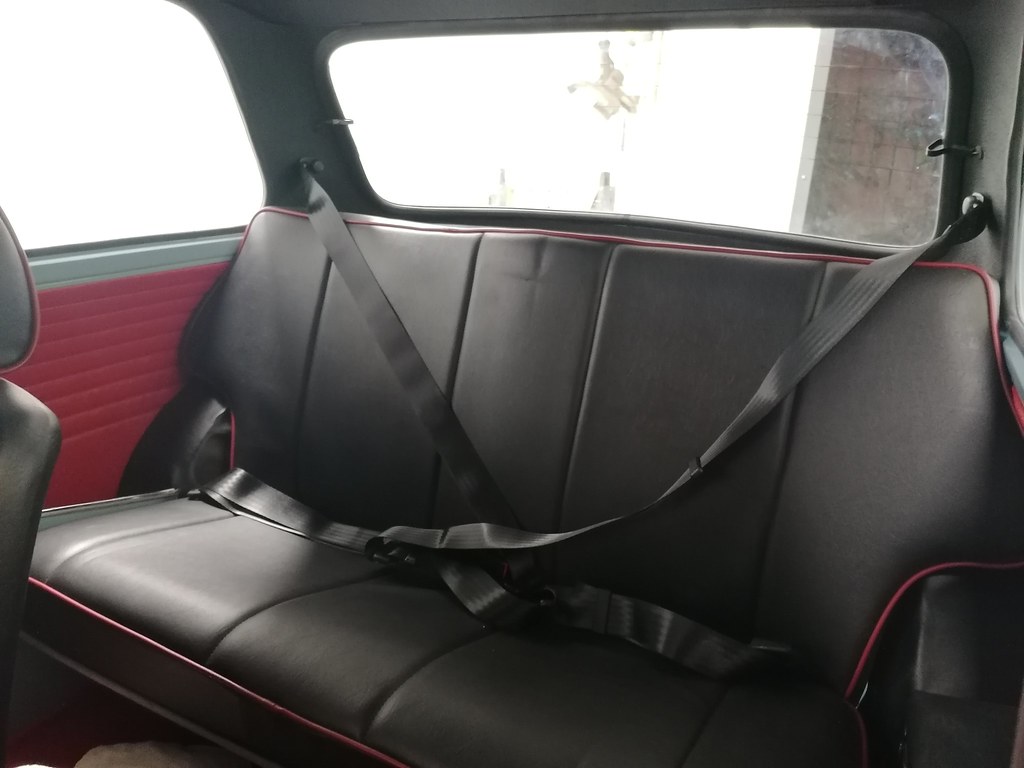
Got a fuel filter fitted just after the tank. Then got the rear seatbelts put in, pretty straight forward, just cutting the C-pillar covers in the right spot was tricky.
3D printed a holder for the tachometer, 2 M6 bolts pinching the inside of the lower dash rail, then the pod housing will be glued to this holder. Its a RVI tacho, so just need to sort the wiring and get a bulb holder.

The heater pipe is kinda in the way at the moment, have to cut an opening in the small dash liner panel I made, try get it as tidy as I can.
To get the vacuum past the oil pipe I pulled the dizzy body out slightly and that gave enough room to get it passed it, then got the points set to starting to open.
Got a fuel filter fitted just after the tank. Then got the rear seatbelts put in, pretty straight forward, just cutting the C-pillar covers in the right spot was tricky.
3D printed a holder for the tachometer, 2 M6 bolts pinching the inside of the lower dash rail, then the pod housing will be glued to this holder. Its a RVI tacho, so just need to sort the wiring and get a bulb holder.
The heater pipe is kinda in the way at the moment, have to cut an opening in the small dash liner panel I made, try get it as tidy as I can.
-
colinf1
- NON Member
- Posts: 421
- Joined: Mon Aug 24, 2020 10:27 am
- Whats your location?: Dundalk
- Region: Eastern
- What Minis have you?: 1983 Mini City 1000
- Contact:
Re: 1983 Mini City
A few jobs done over the last few evenings, bonnet put on and adjusted, it's nearly there just need a bit more length in the slots for hinge in drivers side, think I can eek out another 2mm that should pull the bonnet in at the front panel to almost where it needs to be.
Pop riveted the bonnet chrome molding on.
I also reprinted the engine bay decals, this time I added a clear vinyl layer over them as the laser toner on the first lot had started to flake off, they look much better now.
Heater switch and panel reinstalled, replaced the standard switch with a toggle switch, decal also printed at same time as engine decals.
I'm hoping to get it started this weekend, then hopefully running for a while to check for leaks once it's up to temperature and hopefully the fuel pump is working OK.
-
colinf1
- NON Member
- Posts: 421
- Joined: Mon Aug 24, 2020 10:27 am
- Whats your location?: Dundalk
- Region: Eastern
- What Minis have you?: 1983 Mini City 1000
- Contact:
Re: 1983 Mini City
Picked up a chrome grille cheap on one of the Facebook pages, as I wasnt set on the original type grille, but after testing both I think I prefer the original type...

or

Chrome grille seems to sit better, bonnet still needs tweaking, get round to that tomorrow....
or
Chrome grille seems to sit better, bonnet still needs tweaking, get round to that tomorrow....
-
colinf1
- NON Member
- Posts: 421
- Joined: Mon Aug 24, 2020 10:27 am
- Whats your location?: Dundalk
- Region: Eastern
- What Minis have you?: 1983 Mini City 1000
- Contact:
Re: 1983 Mini City
Well turns out the fuel pump wasn't working at all, filled the bowl again with a capfull of petrol, ran and then cut out once the bowl had emptied. Swapped it out with a spare I bench tested, then struggled to get the rubber pipe onto the front to rear fuel line, think I lost about half a litre. Got everything back on and started it, it ran for a good while but then the smoking from clutch housing started again. Accompanied by a squealing when operating the clutch - I'm thinking the release bearing???
Bled it a few more times, the pedal felt better but the squeal returned after a few more pedal operations, clutch housing was also hot. Took it for a few spins up and down the estate road, brakes definitely need bleeding more, alignment is way out and it's very very noisy.
It won't start with the airbox on, it has a brand new K&N filter so not sure what's going on there.
Then noticed a nice oil puddle forming, looks like it's from timing chain cover, dried it off and left it for an hour on some cardboard, but not a drop on it, so must be when it's running and hot.
On the positive side, my speedo, fuel gauge and water temp gauge all work and we got it up and back down the side of the house with tremendous difficulty. Once it's running, it definitely won't be living in the shed.
-
colinf1
- NON Member
- Posts: 421
- Joined: Mon Aug 24, 2020 10:27 am
- Whats your location?: Dundalk
- Region: Eastern
- What Minis have you?: 1983 Mini City 1000
- Contact:
Re: 1983 Mini City
The clutch that I put in it at the time of rebuilding was a NOS Valeo, dated 1993, so could the release bearing grease have dried up?
Ordered new clutch kit this morning, along with a few gaskets for timing cover side, plan is to borrow engine crane and get it out over the next few evenings, then hopefully I can get it all back in and driving in time for its 1st show on the 17th June.
Ordered new clutch kit this morning, along with a few gaskets for timing cover side, plan is to borrow engine crane and get it out over the next few evenings, then hopefully I can get it all back in and driving in time for its 1st show on the 17th June.
-
woody
- IMOC Paid Member
- Posts: 2819
- Joined: Mon Feb 07, 2005 11:55 pm
- Whats your location?: Drogheda
- Region: Eastern
- What Minis have you?: Traveller
Turbo
Hornet
Equinox
MINI Clubman - Location: LOUTH
- Contact:
Re: 1983 Mini City
Your clutch would have been a 184mm and the '93 could be a 190mm
Does the smoke smell like clutch pad wearing. I would be worried about the primary gear seizing on the crankshaft. I can't think of anything else that would cause a lot of heat. remind me what work was done around clutch and drop gears. could there be a thrust washer missing on the drop gears. I wouldn't be running it without further investigation.
Does the smoke smell like clutch pad wearing. I would be worried about the primary gear seizing on the crankshaft. I can't think of anything else that would cause a lot of heat. remind me what work was done around clutch and drop gears. could there be a thrust washer missing on the drop gears. I wouldn't be running it without further investigation.
TECHNICAL MODERATOR
-
colinf1
- NON Member
- Posts: 421
- Joined: Mon Aug 24, 2020 10:27 am
- Whats your location?: Dundalk
- Region: Eastern
- What Minis have you?: 1983 Mini City 1000
- Contact:
Re: 1983 Mini City
Not exactly how I wanted to be spending my evenings...

Felt it would be easier to lift the engine out to inspect clutch and the oil leak on rad side than to struggle for access in the engine bay...
Just the driveshafts and ball joints to disconnect then it's lift out time!
Felt it would be easier to lift the engine out to inspect clutch and the oil leak on rad side than to struggle for access in the engine bay...
Just the driveshafts and ball joints to disconnect then it's lift out time!
-
colinf1
- NON Member
- Posts: 421
- Joined: Mon Aug 24, 2020 10:27 am
- Whats your location?: Dundalk
- Region: Eastern
- What Minis have you?: 1983 Mini City 1000
- Contact:
Re: 1983 Mini City
It does smell quiet stinky, so I'm guessing its not fully disengaging so just wearing/burning constantly. Everything that came off the engine went back on unless it was being replaced - idler bearing , thrust bearings on crank, then new locking bolt on end of crank.woody wrote: ↑Mon May 29, 2023 8:51 pm Your clutch would have been a 184mm and the '93 could be a 190mm
Does the smoke smell like clutch pad wearing. I would be worried about the primary gear seizing on the crankshaft. I can't think of anything else that would cause a lot of heat. remind me what work was done around clutch and drop gears. could there be a thrust washer missing on the drop gears. I wouldn't be running it without further investigation.
It should be out this evening to get the clutch cover off and have an inspection
-
colinf1
- NON Member
- Posts: 421
- Joined: Mon Aug 24, 2020 10:27 am
- Whats your location?: Dundalk
- Region: Eastern
- What Minis have you?: 1983 Mini City 1000
- Contact:
Re: 1983 Mini City
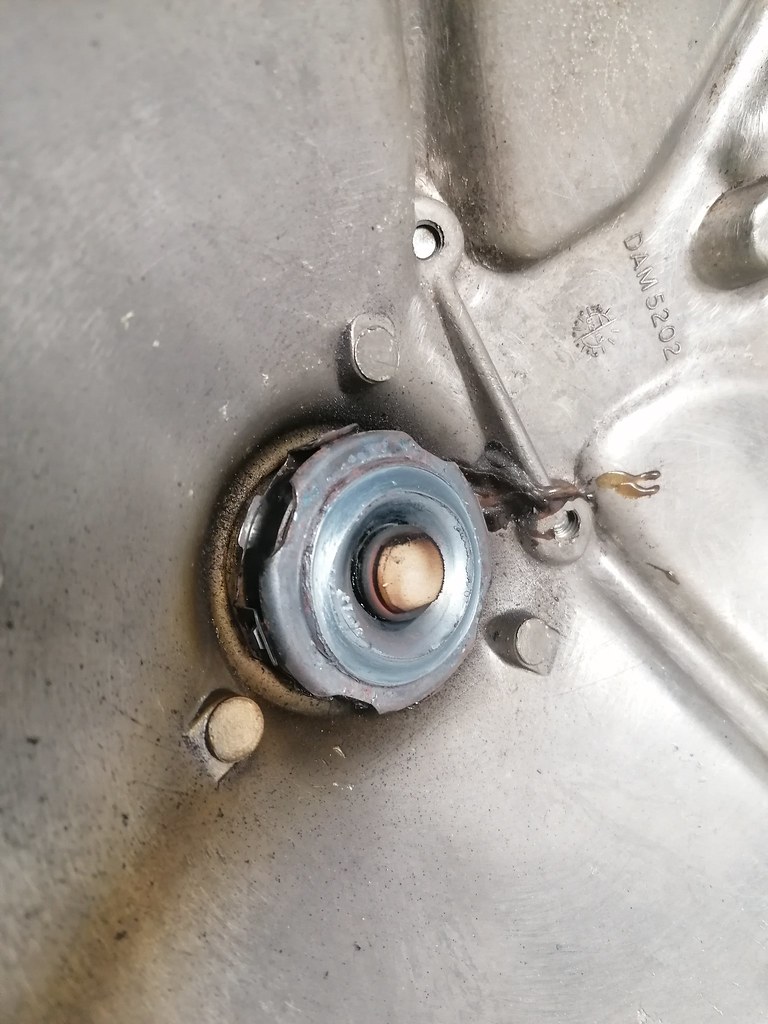
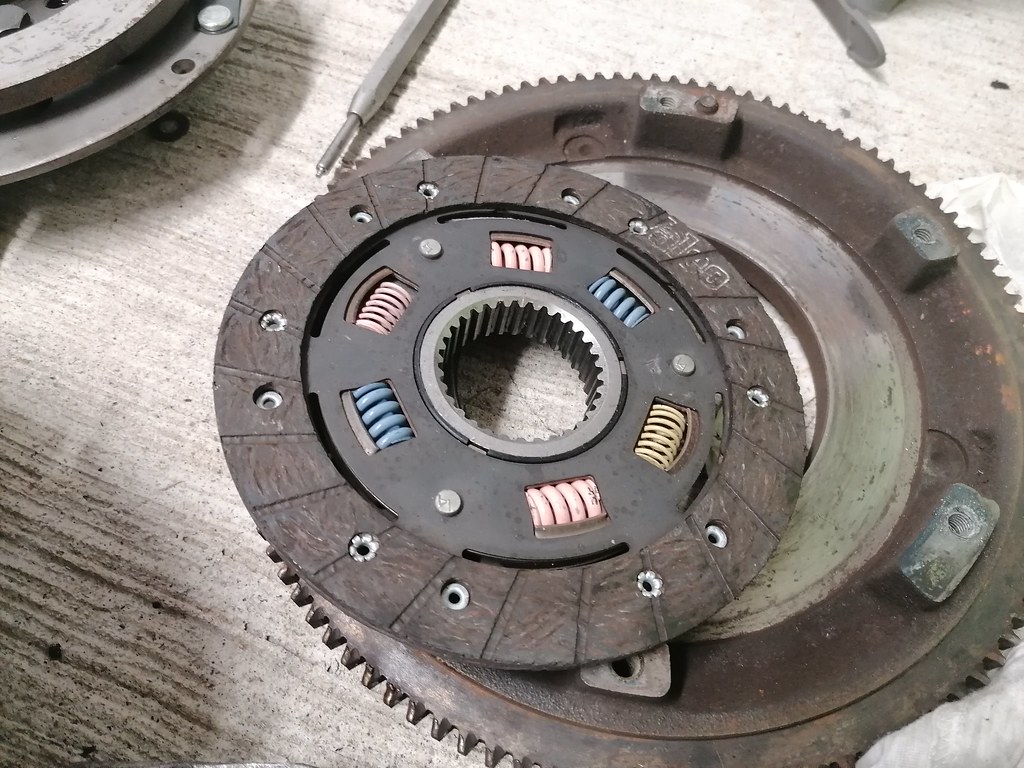
Got engine lifted out, bit of a rush job as engine hoist is needed at work tomorrow. Forgot to remove gear linkage,so bit of faffing to get that roll pin out. Then had a scare as hook wasn't fully engaged with the lifting lug, was sure it was gonna slip off if tried to lower it back into, so clamped some vice grips between hook and lug just as added protection.

Took off clutch wok, bearing was toast..
I think I put it in the wrong way around...
Clutch plate looks fine, but its a 190mm diameter rather than a 180mm for a 998.
Oil leak on radiator side is coming from mechanical fuel pump, new gaskets ordered for that.
Then clutch master cylinder decided to start leaking, quickly cleaned it all up and drained out the rest of the fluid, will investigate that tomorrow.
-
woody
- IMOC Paid Member
- Posts: 2819
- Joined: Mon Feb 07, 2005 11:55 pm
- Whats your location?: Drogheda
- Region: Eastern
- What Minis have you?: Traveller
Turbo
Hornet
Equinox
MINI Clubman - Location: LOUTH
- Contact:
Re: 1983 Mini City
Do you have the top hat that goes between clutch and bearing?
TECHNICAL MODERATOR
-
woody
- IMOC Paid Member
- Posts: 2819
- Joined: Mon Feb 07, 2005 11:55 pm
- Whats your location?: Drogheda
- Region: Eastern
- What Minis have you?: Traveller
Turbo
Hornet
Equinox
MINI Clubman - Location: LOUTH
- Contact:
Re: 1983 Mini City
I think the bearing is the correct way round but the shaft appears to be touching the clutch retaining bolt. Is the bolt and lock washer sitting all the way home? Is the top hat touching the bolt?
TECHNICAL MODERATOR
Who is online
Users browsing this forum: No registered users and 3 guests